Showing posts with label S2621. Show all posts

02 June 2011

S2621 bodies bound, still need eyelets

I meant to post this pic yesterday when I snapped it, but forgot as my head is still fuzzy from this miserable sinus crud.  I finished up the binding on the corset tops and bottoms the other night, but still haven't felt up to hammering in my eyelets yet.  However, this is a milestone for me - the first time I am showing a pic of the lining inside!
S2621 corset bound
It may not be beautiful on the inside quite yet, but this is definitely the best looking one I've done to date.  One of my stated purposes of doing mockups to to practice techniques, and this one has fit the bill on trying to make decent looking linings.

I used retail-bought bias tape for the binding, mostly because I wasn't feeling up to making my own since the jacquard stripes would show if I wasn't perfectly on the bias.  I already had a headache for the past week ... why add to it and risk frustration?  Meh, maybe I am just trying to justify a bit of laziness here.

Either way, it is still waiting on eyelets.  I think I'll use the "antiqued brass" colored ones instead of the shiny goldtone ones.  In the meantime, I do have things cut out that I can sew together - rayon floral tunic, light colored denim mid-Victorian ... plus I need to remove cat hair from the core layers of the mid-Victorian.  My shed monsters struck again.

29 May 2011

S2621 corset boned and basted

Believe it or not, I am still alive ... even though in the past week I have felt like that was debatable.  I've even managed to make some progress on my Simplicity 2621 corset mockup.  Just very slow progress.  I did finally get all the cable ties cut and filed and basted in ... despite my fat fluffy cat's best attempts to "help" catch the end of the cable tie when I was filing the ends smooth.  So it's boned, and sitting on the corner of my table this morning:
S2621 corset boned and basted
It has cable ties in the middle, but I chose to "hide" them by only stitching the boning channels in the middle two canvas core layers.  I think the pic itself is fuzzy ... and not just me still feeling fuzzy.  Meh.

The entire house has the sinus crud.  Hubby has employed a wet warm washcloth to get his eyes all the way open, and son's voice sounds as raspy as mine ... meanwhile I have been resisting the urge to check my ears after each sneeze to see if any brain matter has been forced out.  Blech ... y'all probably don't want details.  Just that y'all know it's bad when I leave Ren Faire early like I did yesterday.

Since we're not going today - still hoping this mess will decide to clear up and LEAVE the house - that leaves only tomorrow, the official last day of Faire.  I still don't have my new Elizabethan corset mockup done yet ... and last year's version is too stretched out to wear anymore.  Yesterday I went in my denim mid-Victorian again, as my back was acting up and I really needed the lumbar support.

If I can get my few tiny thoughts focused today, I should be able to bind this and put in eyelets (dependent upon headache level, of course).  Here's hoping.

26 April 2011

S2621 corset - boning

So I broke out the fabric marker and ruler and planned out my boning (since I am probably off the pattern ... I haven't even looked at the instructions since last year!  LOL)  I was sewing veeerrrrrryyyy slllllooooowwllllyyyy in a sincere attempt to get these channels sewn straight ... the stitches themselves might not be perfectly straight, but I stayed on the fabric marker line today!  Of course, once the first line was sewn, then it was easier to slide a cable tie in and use the boxy zipper foot to snug up to it.  Pic snapped this afternoon:
Boning for S2621 corset
It's not period-correct, but that isn't what I am going for on this one.  I happen to really REALLY like the support these cable ties give me.

Oh, a new one for the "Thank you, Sgt. Obvious!" file: I have discovered - by accident - that topstitching looks so much nicer when you press it afterwards ... apparently "everyone" knows this, but I honestly don't recall seeing anyone ever mention it.

S2621 corset going strapless

Yes, I finally made up my indecisive mind on this: due to the lovely jacquard striping of my outer fabric (unknown home dec remnant) I will be making this version of the Simplicity 2621 Elizabethan corset ("pair-of-bodies") strapless.  My mind is so made up, I even cut off the outer top of the shoulders where the straps are supposed to attach:
making S2621 corset strapless
I actually snapped this pic yesterday afternoon ... right before the weather sirens went off and we went under tornado warning.  After the all-clear noise, I promptly forgot about the pics sitting on my memory card.  Hubby said last evening that the funnel cloud was up by Ft. Campbell.

This morning was the third in a row I've woken up to the roll of thunder ... and the second in three days most of my clocks have been blinking the wrong time.  In fact, son's school had to have a 2 hour delay due to power outages!  Yeesh ... enough of this storm and rain!  I would happily send it to Texas where they are worried about wildfires.  We're under flood warnings here (again).

Back to the Elizabethan corset ... I have realized I forgot something important!  I forgot to put in the twill tape for the waist and underbust.  Bleh ... this version won't hold up for long, at least not as well as it would have if I had remembered.  I do think I have settled on a boning scheme for it, though.  As long as the power stays on, I should get the channels sewn today.

Meanwhile, work continues on the second denim mid-Victorian ... and my fingertips are not happy with me after basting the denim outer layer last night and this morning.  This denim is beefier than the last one, but pics will have to wait until I can switch thread on the machines and stitch it up.  Another good reason to knock out the Elizabethan full mockup (which is what this home dec jacquard stripe version is).

24 April 2011

S2621 corset: Boning channels and directional sewing

First of all ... I am already sick and tired of this storm front!  It rolled in a little after 11 last night and promptly knocked out our power ... while the power has stayed on for this morning, we keep getting bands of strong storms, and this early morning's lightning strikes sounded almost on top of us.  What a way to wake up ...

I've already started up on sewing together the layers for my Simplicity 2621 Elizabethan "pair-of-bodies" (the period term for a corset).  I have the front boning channels on either side of the eyelets in, and it occurred to me I haven't mentioned a mysterious peculiarity of sewing boning channels: directional sewing seems to count!  I haven't seen an actual explanation for this, but each time I've seen it mentioned, the person posting it swears it makes a difference even if s/he doesn't know why.  Once you start sewing the boning channels on a corset panel, you need to continue sewing in that direction ... or you end up with small wrinkles around the boning.
directional sewing - boning channels on S2621
If you check the larger image, you'll see yellow pinheads on only one side of each corset half: marked "top" on this pic, as in the end that gets sewn first.  This is how I am keeping track of my directional sewing this time, and I find it so much easier than leaving thread tails!  Now, for a closeup, just because it came out clear!
Closeup front boning channels S2621 Elizabethan corset
Another plus of this closeup turning out clearly is I can show off my outer fashion fabric layer: an unknown home dec remnant that has a jacquard/brocade style stripe to it.  I am hoping the vertical stripes provide for a visually slimming effect ... although I strongly suspect they will mess with the shoulder strap idea.  If so, I will simply make this one strapless.

23 April 2011

Setting the smock aside

OK, I'm going to set it to the side and let it simmer on the back burner of my mind ... the construction part is done, and I gave it a good pressing after trimming the excess trim.

Simplicity 2621 smock pressed

Sleeve detail of embroidered trim
My son suggested triangles instead of squares for the corners ... that also has appeal.  He actually meant mitering the trim corners ... but that still wouldn't fix the one corner in back.

It does definitely look better after pressing most of the wrinkles out ... but it's already picked up a few new wrinkles!  LOL  Hey, it's linen.  Besides, this is the undermost garment, so only the sleeves and neckline will show anyway.

Now, to write up the review ... I'll get a detail pic on the neckline trim after I fix it.

Simplicity 2621 smock put together

It's put together ... now I need to figure out how I'm going to finish the embroidered trim around the neckline.  The embroidered trim for the sleeves came out perfect ... the neckline trim ... not so perfect.  First, the pics (it's very grey today ... but at least it's not green or yellow clouds!)
Simplicity Tudor chemise front (in progress)


S 2621 Tudor "shift" back (in progress)
 
Elizabethan smock - neckline detail (in progress)
OK ... geek time (just because I AM one ...) I'm mixing terms here because there is no one single, agreed-upon term.  Time period is Renaissance (broad category), Tudor period (a bit more specific), and Elizabethan (more specific).  Elizabeth I was the last of the actual Tudors, who refused to marry because that would be giving up her authority.  The Tudor period saw the Renaissance reach England, so this smock is from the Renaissance - Tudor - Elizabethan period.

So ... is it a smock, a shift (as the pattern calls it), or a chemise?  I've seen all of those terms used ... along with spelling variations to boot in contemporary quotes!  Just like there are variations of how Shakespeare himself spelled his own name (he was also Elizabethan period), there just weren't set spellings at the time (tyme?) so the different terms may have had subtle differences in the garments described ... or not.  It could just be regional variances within England (kind of like the regional difference between y'all and youse guys and you, the unspecified plural).

While I tend to use the term smock, shift is probably more appropriate for this particular garment, as the handkerchief linen is very lightweight and as the pics show, it's pretty see-through.  Either way, the actual construction part is done.  It does still need another pressing/attack with hot iron.

Now I need to unhose the neckline trim ... I'm not sure what exactly happened, but the trim pieces ended up just a smidge too short.  So time to trot out my mom's "greatest secret of sewing": the secret isn't perfect mistake-free sewing ... it's knowing how to cover up your mistakes or, if they can't be covered up, how to make them look like intention design details.  Right now, I am leaning towards seeing if I have green fabric that matches the embroidery thread to make squares in each corner, then satin-stitch them on with the white.  Maybe even put a little white-stitched flower in the middle ...

21 April 2011

More embroidered trim for smock sleeves

I forgot to mention (actually, post!) yesterday I discovered the embroidered trim I made up didn't fit the sleeves for my S2621 smock ... it's just too short.  So yesterday - after the power was restored from the storm - I fired up the daily driver Brother to start putting the smock together, then brought my emb Brother back out to redo the trim for the sleeves.

This time, I used the smaller version of the Forget-Me-Not border and repeated it twice.  This makes for narrower trim, which will probably look better on a narrow-hemmed sleeve bottom.  It occurred to me today someone somewhere might want to see an in-progress pic of this - here is after the embroidery with lines added to put on the satin stitch (zigzag, a bit narrower and short enough to look satin-stitchy).

Small vs. large Forget-Me-Not trim

Small Forget-Me-Not embroidered trim
I have the larger design at the top of each pic as a reference point between the 4x4 small and the 5x7 large designs.  I hooped the small set looser, since last time hooping tighter didn't get rid of the wrinkles ... and the wrinkles are still there.  *Sigh*  Hooped regular, tight, and loose ... without noticeable difference in wrinkles ... leaves me with the conclusion it's either the linen or the thread or both.

Now, to finish sewing this smock up ... I am getting tired of moving the pieces from the table to the ironing board to an unoccupied chair and back!

18 April 2011

Custom embroidered decorative trim!

Happy!  Excited!  IT WORKED!!!!!!  My custom embroidered decorative trim for the neckline and sleeve edges for my Elizabethan smock (Simplicity 2621) has turned out the way I hoped it would!  Happy dance time!

custom embroidery trim: Forget-Me-Not

Forget-Me-Not custom trim
 Sometimes ... well, often ... my experiments don't turn out as I hoped.  So when one actually does come out looking like the picture in my head, I get very very excited and happy.  This embroidered decorative trim idea is exactly what I wanted ... well, it will look much more like planned once I wash the fabric marker off the edges.  I used a very short zigzag to create the satin stitch at the edges, and the pinked ends will be inside seams, folded under, or covered by a cross piece of trim.

OK, *now* I am excited about making this smock!

17 April 2011

Machine embroidery embellishment for S2621 smock

I've mentioned my embroidery machine has been whispering to me about inactivity .... I played with it on and off yesterday and with a little sunshine today have pics to show off!  My embroidery machine is far and away my most expensive machine ... I paid more for it than all three sewing machines combined but am quite happy with it.  It's a Brother PE-770 stand-alone that uses a USB flash drive/stick, so I shouldn't outgrow it for quite a few years.  Not to mention, I adore the results ....
Forget-Me-Not test


Forget-Me-Not in the hoop


Forget-Me-Not shoulder pieces
 I had thought about using a Foxglove design, just to see who might recognize it, but then noticed the Forget-Me-Not border design and fell in love with it.  I still have one more shoulder piece to do, then the front and back of the neckline which is wide enough for two of the design (which will require me to rehoop ... this should be interesting!).  I had originally planned to embroider the facing, then have it on the outside, but as I mentioned yesterday my air dry marks disappeared, plus on the test the fabric pulled and wrinkled too much with just a single layer of the handkerchief linen.  However, using two pieces of hankie linen and three pieces of Solvy worked better in the hoop ... except a smidge of wrinkling which I suspect is the thread shrinking.

I plan to satin stitch the edges with white, and sew in on like decorative trim (err, it actually is decorative trim, just the kind I've made myself!) and I am seriously thinking of measuring the bottom of the sleeves and putting some there as well instead of a fabric ruffle.  The benefit of this idea: it will keep my cuffs out of my food!  LOL  Not only is Ren Faire either muddy or dusty (there is no in between, it seems) but I often end up wearing my condiments for half a day ... and I am not the only one.

The emb machine is calling me ... although the cast iron skillet is also ...

14 April 2011

Prefitting Simplicity 2621 Elizabethan corset

I mentioned the other day I had cut out the canvas fit muslin for my new Elizabethan corset (called a "pair of bodies" during the Renaissance period).  This morning I decided to unlace my previous Elizabethan and compare the pieces, since I could feel the old one had stretched.  My simplistic 3-layer construction last spring using two layers of home dec plus a layer of cotton muslin in between proved to be useful for actually seeing where the fabric warped from wearing stress:
This is useful ... you can see the channels where the hemp cording is ... those channels were originally straight when I made it last year, and this corset has seen just shy of a year's worth of wearing.  The major stress is definitely at the waist, with secondary stress just below the bust.  The front doesn't lay flat ... the undesirable consequence of using the poly boning so often found in sewing stores ... it has a low enough temp tolerance to mold with just body heat.  My cable ties should fix *that* problem.
Oh, a note about the Simplicity pattern's shoulder straps: according to the pattern they are bias-cut.  Bad idea, Simplicity!!  Darn things stretch.  Now, for my canvas fit muslin, laid over the old finished piece:
I cut the canvas using the same pattern pieces as last year ... in theory they should have matched up.  So my old Elizabethan did the majority of its stretching in the front ... hmmm ... right now I am thinking to extend the center front (which should have been cut on the fold for an only back-lacing bodies) and taking that amount extended out of the side and back, and then "take out" more from CB and CF via seams - 1/4 inch in front and 1/2 inch in back.  I think twill tape at the two stress points will help reduce the warping.  Now, to ponder on the boning versus cording versus combination idea ...

07 April 2011

Let the garb sewing begin

Yesterday I was wondering what I wanted to sew next.  Since I found where I put my smock from Simplicity 2621 (shift, chemise, underdress ... I've seen all these words for the same garment) I decided to try it on with my Elizabethan corset to see how it fits ... now that I know more about fitting than I did last year!  Not only do I need to make a new Elizabethan corset ("pair of bodies" as it was called at the time) but I will need a new smock as well, as the shoulders falling down will annoy me before I can even leave the house.  Here is a mirror pic of the smock and bodies:
As if dressform and table pics weren't bad enough ... mirror pics are a (bleep)in PITA to try to get right!  And yes, my bathroom walls really are THAT pink.  As a reference point, the straps on my Elizabethan often fall off my shoulders .. and I just could not get the shoulders of the smock to stay on my shoulders for nothing ... after about three minutes of putting it on.

Time to break out that lovely white handkerchief linen and get going on a new smock!  I'll start by reworking the pattern, after rereading my pattern review from last year.  As for the corset, I will start all over on fitting that, and follow instructions on incorporating boned tabs like the Effigy Corset.

I'm almost done with my second cup of coffee, so pattern work should commence soon.

29 January 2011

Thoughts ramblings and sewing levels

Finally cutting into the mystery home dec fabric for my V8626 mockup, and I've discovered it has a wiggly slightly stretchy quality to it I didn't notice over a year ago when I made a boned bodice out of some of it.  This led to some random musing about not only how little I knew a year ago, but also how little I still know.  My idea of handling this property of this still-don't-know-what-it-actually-is fabric?  Glass and metal candle holders and more pins.  I'm sure there is a trick I just don't know about, but I'm not inclined to wait around for someone to tell me.  I'm in a mood to attack fabric with pins and blades and ain't stopping until it's time to thread up my machine!

While hunting up more long yellow-headed "pleat pins" that my mom told me she hates, another thought rambled through my caffeine-fueled mind: not only am I still unorganized, but I am still quite the stubborn little newb.  My mom has decades of sewing experience, and advised me not to use these pins ... yet here I am digging through bags of stuff to find them.

This amused thought led to another, less amusing one: in the PR chat room, one gal says she used to think she was an intermediate sewist until she met me and maggie.  For the record here - we both insist we are newbs.  We just want to make things well beyond our respective skill levels and have no hesitation at the idea of diving right in and learning as we go.  We're both quite crazy in this respect - and have spent several evenings discussing this.  So please, unless you think you are as crazy as either of us, don't compare yourself to us!

Speaking only for myself now, I can say I now know what a welt pocket is ... which is a step better than last year.  I now also know an invisible zipper is a separate item from a regular zipper, and the invisibility does not depend on how you put it in (compared to a regular zipper again).  I haven't done either one.  Nor have I made myself a nice jacket yet, much less one for hubby.  Pants?  Err ... nice loose swishy stuff, nothing fitted.  While I did a mock fly, I still haven't gotten back to the Simp pattern with the real fly.  Don't get me started on knits ... and the funniest thing is many swear knits are easy!  I'll take fitting a corset over sewing a knit top any day ...

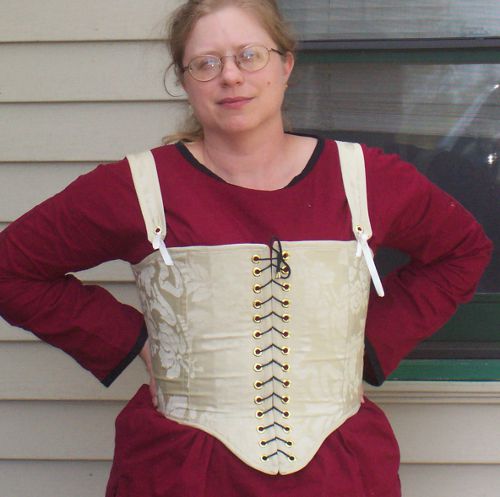
Which - as usual - brings me back to corsets.  When I started making first the boned bodices, then my Elizabethan, I didn't really know corsets are supposed to be "advanced" and difficult.  I just knew I needed an Elizabethan pair of bodies for my Renn Faire garb, and didn't know anyone to fit and make me one at the time.  So, if I was going to have one to wear for Faire last spring, I had to figure out how to make it myself.  I'm wearing it right now.  Pics for those who haven't seen it:
My Elizabethan isn't perfect.  I still can't sew a straight line seam, and believe me that led to much cussing and frustration last year when I sewed the cording channels, then tried to pull uneven hemp cord doubled through unevenly sewn channels.  This year I will be zigzagging the hemp cord to the canvas core ... but will be using large cable ties from the hardware store instead of poly boning ... so I'll still be sewing channels.  I'll try to remember to use black thread to stitch them so y'all can see how badly I miss the fabric marker lines I need to draw to have any hope of some semblance of straight lines.
Not even a year has passed since I made my Elizabethan ... and already I want to make a better one.  I've learned quite a bit from making it last spring, and even more while wearing it these past ten months.  The biggest thing I've learned is ... it actually doesn't fit me quite right.  It's close enough to not be uncomfortable, but it's a bit short through the torso, and the straps slide off my shoulder which means something aint' quite right there.  As y'all can see from this back view, it gaps in a couple spots and overlaps at the very tops.  With wear, it now gaps a bit in the front as well.  Part of the problem is fitting (which I really didn't have a good grasp of the concept last year) and the other part of the problem is my fabric choice.  Then again, reading through my review of the pattern from last year ... I had my hands full just getting a wearable garment!  Oh, for those curious, this is from Simplicity 2621, which is a pretty decent pattern for being a Big 4 costume pattern, and does result in something wearable.

Don't y'all love when I come back after a day or so of quiet?  I had another bleh day, then yesterday had both motivation and energy ... and did more housework!  LOL  I even reorganized my pantry after a massive cart-filling grocery trip, and got my son to organize his shelf of the pantry as well.  Today is a big fabric-attacking day for me, since hubby and son escaped to a war gaming tournament for the day.