Showing posts with label vest. Show all posts

22 July 2012

Crochet sweater vest started

I finished up the baby blankie I've been working on since late March (I thought I posted it ...?  I must have been interrupted) after the first power outages in the storms a little over a week ago or so ... we got rain!  We sure needed it, since even the dandelions and quackgrass in the yard were giving up the ghost.  Not all of the garden survived (the sunflowers were knocked down by storms and didn't recover) but the squash is finally producing fruit, the 'maters survived both storms and hornworm, and the green beans are slowly coming off strike.

Now that the baby blankie is finally off the hook, I've been spending down time between yardwork trying to figure what to make next.  Yesterday's trip to Hobby Lobby yielded a project as 6 skeins of bamboo-wool yarn jumped off the clearance table and into my cart (of course, it cried, "Take me home!").  A thrift store book score from last month yielded the pattern: an 80s-style sweater vest.
Sleeveless shell top - aka 80s sweater vest
As you can see, I got started on it already this morning (after doing up a test square last night in some of my variegated cotton worsted, which will probably end up as a cute little bag).  I only have one skein of the blue, and want to stretch it out, with two of the "grape" purple and three of the red ... so it's seems obvious to me the shell part on the body should be red.

A quick pic of the book, for those whose tastes match mine who may wish to hunt this one up:
Granny Crochet Favorites - Leinhauser & Weiss, c 1989
It has a lot more than just afghans ... along with a dog blanket, bags, placemats, and whatnot there is also a nice pullover long-sleeved sweater pattern in it I plan to try once I get enough yarn all in the same fiber and weight.

Note to self: post the baby blankie pics soon.

11 January 2011

S2566 blouse and vest

The buttons are on and the vest is finished!  I managed to persuade my teenage son to take pics, and he insisted I try everything on for Thursday evening.  Since I only have a little over 48 hours until the banquet, I won't get black slacks done up, so I will be wearing brand new black jeans with the blouse and vest ... but I am quite pleased with how this turned out overall.  Especially my first attempt at plaid matching.  First, the back view:
Hmm, little bit of pooling in the small of my back ... looks like I might need to learn the swayback adjustment next ... after I nail down the FBA idea, of course.  Now, about that FBA:

It buttons over my boobs without gapping or pulling!  That alone is a victory for me.  I'll need to refine my shaping skills, as I have a bit of gapping at the armhole ... but it's also possible I unintentionally pulled the fabric.  Guess who skipped the staystitching again?

I have plenty of room in the waist, even without curving my seams outward on the sides seams.  Since I had to wait for my son to finish his breakfast, I've been wearing it for a good 20 minutes and moved around and even tied back my hair while waiting, so I know for sure I have freedom of movement in this.

Overall, I like this pattern.  Once I get the blouse's side dart FBA just right, I'll trace this one off onto the red dot stuff so I can use it more.  I probably won't need too many vests like this, but a summer one could come in handy for son's end of year awards functions.

Next up in the "to sew" list: cotton flannel long sleeved shirt for hubby ... in plaid.  LOL

Vest finishing touches

Last night I sewed the lining to the wool, trimmed the seam allowances, and turned it ... but didn't snap a pic because I hadn't pressed it.  Now the vest is pressed after hanging on Mathilda my dressform all night, and I sewed the side seams together.  I was in a groove and didn't feel like taking a pic break, so ... on to the buttonholes!
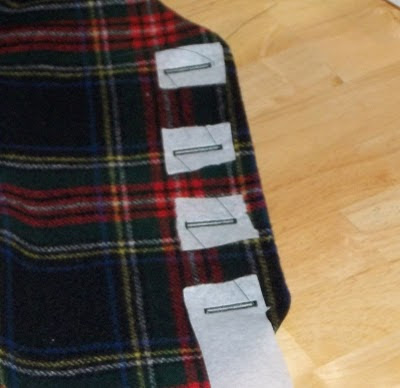
My camera's auto-focus picked a different spot than the buttonholes to focus on, but you can see them decently ... and yes, I broke out my embroidery tear-away stabilizer to sew them in, even though the back of the lining is interfaced.  I didn't want to take a chance on my wool stretching any, but at the same time I decided against putting interfacing on the back of the wool.

I went with horizontal buttonholes, as this is a rather close-fitting vest and I don't want any distortion to show if it's one of my water-retaining days when I wear it.  All that's left is handsewing the shank buttons on ... the 7/8 inch version of the buttons I used for the blouse's cuff.  Hopefully the larger version will photo better than the tiny ones did.

10 January 2011

It looks like a plaid vest now

Today I laid out the pieces, cut them out, and after a nap put the various plaid wool pieces together into something that now strongly resembles a vest:
Looks like I got lucky in the front with the vertical "mirror" image even plaid matching up!  The princess seams won't as impressive, as the wool shifted slightly while sewing ... plus there's that whole curve idea ... which I also did on the waist.

Now comes the fun part: pinning the lining to the plaid wool along all but the side seams.  This may take a while, but I did break out extra pins for the occasion.

Plaid matching ... sorta

I'm a bit slow to get moving this morning.  Maybe I need more coffee, or maybe it's because I sound like a bowl of Rice Crispies trying to move around.  My son celebrated his snow day off school by sleeping in ... and since he's finally up and moving I guess I should make an attempt at moving around myself.

I had to wait my turn for the dryer yesterday, and while I did get the wool run through the dryer with a hot wet towel ... I didn't layout the pattern pieces are do any cutting.  However I have started that this morning:
Maybe I'm just not feeling too adventurous this morning.  Or maybe my cheap gene is telling me the $1/yd cotton print plaid would be better to do full plaid-matching than this lovely $8/yd wool ... but I am only matching horizontally, using a very convenient shorten/lengthen line on the pattern that is consistent on all pieces just 1 inch above the waistline (which is only marked on the front piece anyway).  I've lined all the pieces up so that one white yarn is centered between the s/l lines on the pattern ... which also required a bit of gentle tugging on the fabric to get it as straight as I am going to accomplish this morning.  I even drew a blue arrow at the top of the pic to point out the lines and white yarn, but the tip of the arrow is a bit off.

I've read that plaid matching is best accomplished by cutting out single thickness, but my Thursday evening deadline is roaring up on me fast.  I have plenty of cheaper plaids to work out the details ... if I'm honest about it, I simply have plenty of plaids.  I do love plaids, so at some point in the near future I will get a better handle on matching these plaids both ways.

Caffeine, nicotine, and sugar are my usual methods of motivation in the morning ... and today breakfast was a piece of my birthday cake from last night, so it's definitely "one of those mornings".  If you have useful tips on plaid matching, feel free to leave them here ... and I'll refer back to them when I am in a more cheerful mood.

Another tip from my "Thank you, Sgt Obvious" file: spellcheck function catches typos.  Who'd've thunk it?

09 January 2011

S2566 vest lining done

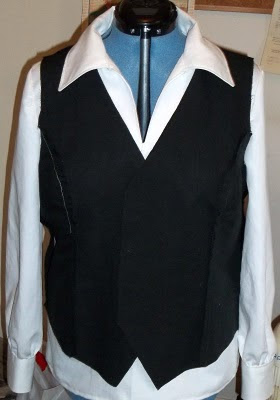
I just sewed up the vest lining, and tried it on with hubby's assistance to hold the side seams together ... and it looks like I not only got the princess seam FBA right, but my "curve the seams out on the princess seams" strategy to bring the waist out from fitting a 32" to fitting my 35" waist worked!  I've done my little happy dance, and dressed up Mathilda for a pic:
Check it out ... Mathilda is stylin' now!  Just a note, I didn't baste the side seams together since I had two extra hands when trying it on, so the sides are open in this pic.  Since black just will not photo properly, here is a different version of this same pic, run through GIMP and with adjusted levels:

Now you can see the seams, and where I didn't quite ease the curve right on the bust LOL.  For those with GIMP, look under "Colors" then select "Levels" and compress the input range to the left by quite a bit to get the same effect.

Time for me to take a deep breath, toss my Stewart plaid wool in the dryer with a warm damp towel ... then cut out the vest in it!  It's both exciting and scary.

08 January 2011

Plaid wool vest with FBA started

Coffee ... this is definitely a "need coffee" morning, with evil white stuff on the ground when I woke up this morning.  I discovered I left my iron on overnight (eek!) so the braindeadness must have started last night.

I did snap an official "start" pic for the vest last night, and played with settings in GIMP until the plaid looked like it does in real life.  A dark plaid is so difficult to photograph properly!
The background of the plaid is black, with yarns of white, yellow, blue, green, and red woven though it ... so lovely in person, and the wool is so soft to the touch.  With the goldtone filligree buttons it should be just awesome ... or at least that is my plan.

Maggie bought some of this wool from FM after I raved about it ... then chided me for understating how it is!  She's done a review of her garment, but not blogged it just yet (that's a hint, maggie!) ETA: now blogged.  I know she spent a couple nights fussing with the waistband, and says she isn't quite happy with it ... but all she needs is a matching vest (or a straight red vest, if you ask me) and an untucked blouse and no one will ever know about her waistband woes.

Right now, I am declaring a tentative victory on the princess seam FBA idea ... I will wait until I have both front pieces and the back done up before declaring a full victory, as up until I got the body done on the blouse I had thought I had that FBA right.  I'll baste the side seams (probably in white for easy unpicking) and try it on to be absolutely certain before I go anywhere near the plaid wool with scissors.

Oh - I am not sewing this vest with black thread.  I know from my previous use of this linen/cotton (the short gaucho pants from the summer) that it ravels just from regular handling while sewing ... there is no way it would hold up well to much seamripping, especially not black thread on black fabric.  The stitches when done in black are really REALLY extremely difficult to see unless in direct sunlight ... yes this is the voice of experience speaking.  So, I am using a very dark green thread, which I can see by the Ott-light if any seamripping will be necessary.  Do I dare to hope for no further ripping other than the white thread?

07 January 2011

Simplicity 2566 vest - princess seam FBA

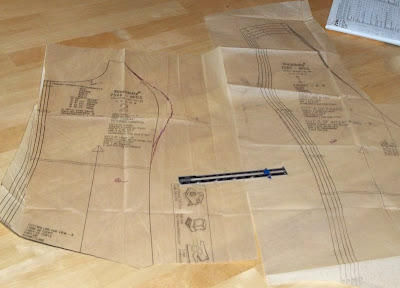
Deep breath ... here I go on the princess seam FBA idea!  Since Simplicity 2566 also has a jumper that uses the same four bodice pieces as the vest .... and I'm still debating the idea of doing this jumper.  I first had to decide how to handle the cutting lines.  I decided if I do make the jumper, I will just tape the bottom back on ... so I cut along the vest's cutting line carefully and folded the rest up neatly.

Then, I held up the front piece to myself to find *my* bust apex and marked it, then lined up the side piece and marked the apex out in the side.  Subtract the amount on the front panel ... and (I think) that should give me how far out I need to extend the side piece, minus seam allowance.  Here's what I have so far:
Wow ... that's out there pretty far.  I tried to smooth the lines a bit, as it just looked funny on first draw.  A closeup:

If it's too big, I can always take it in ... but it's much more difficult to add to one that is too small.

Simplicity seems to believe that someone with size 18 shoulders ought to have a 40 inch bust ... mine wibble-wobbles between 42-43 inches depending on water retention.  Of course, Simplicity's measurement chart also says I should have a 32 inch waist while mine varies between 34.5 and 36 inches - again depending on water retention - so I may need to add to the waistline, which I had to mark on the side piece.  Oddly, there is no finished garment measurement for the waistline, although the bustline finished measurement is printed on both the pattern and the envelope.

If anyone more experienced at a princess seamed FBA sees a major mistake here, please post up a correction!  Meanwhile, I should root around for some lunch, then pull out my linen/cotton to start this experiment on the intended lining fabric.

06 January 2011

S2566 blouse cuff detail

While still trying to pry my eyes open (with the help of coffee, of course) I decided to try to capture on pixels the buttons on my blouse cuffs.  I did resist the urge to add a button to the neckline, so this one has six small buttons on the cuffs, 3 per side.  It took me four tries, and pinning the sleeve up to try to catch the light ... but I not only have a decent representation of these goldtone/silvertone filligree buttons ... I have finally managed to capture the textured weave of this lovely fabric I rave about!
I have a feeling this is as good as it will get for trying to photograph the buttons ... and it isn't hanging right because the sleeve is pinned up ... but now y'all can see why I love this solid white dress shirting.  :)

Moving onwards to the vest now ... I've located all four pattern pieces.  This vest has princess seams in both front and back, and I am leaving the optional back waist belt off because the plaid should be busy enough on its own.  I shouldn't need to fuss with the back princess seams, but now it's time to review my notes on doing a princess seam FBA and give it a go ... on the lining first!

Speaking of the plaid ... should I try to match the plaid at the top of the princess seam, or the bottom?  Right now I'm leaning towards matching the lower part of the princess seam so it's matched (hopefully!) all around my midsection.  Feel free to leave an opinion, as I'll be busy with the pattern and lining for a day (or three ...) or so, depending on how successful I am with the FBA idea on this one.

Now, more coffee, then it's time to break out my colored ink pens.