OK, I guess I got a little caught up in the selection process of the big pattern prize pack win from 3 weeks ago. It happens. I meant to post up links to what I got as I got them. It's the thought that counts, right?
Oh, and I did not buy a lottery ticket yet. I had the idea that perhaps I should wait on that until I've used at least one pattern from each prize donor, and posted up appropriate links here, because one needs to show proper appreciation and gratitude before asking for more. It makes sense to me, at least.
Let me work backwards here, and start with the pattern I just ordered this morning. It should ship by tomorrow or Friday, and is a long out of print Kwik Sew bra pattern (#1018) I didn't know even existed until I saw a review posted up at Pattern Review. It wasn't the written review that got me all excited, it was the pictures, including one of her wearing it. Well, especially the picture of her wearing it - that made me say, "She's built like me! And that fits her GOOD." When I told my friend Lynn about the pattern, she said she wants to see it as soon as I get it in the mail. Oh, I found one listed on Etsy for just under $15, listed as uncut with envelope still sealed. Cool beans!
Picking up where I left off on the prize pack, I chose the Willow pleated trousers from Laela Jeyne. Yes, they look very similar to the McCall's pleated paper-bag waist pants pattern I have ... in fact, my intent here is to compare the two.
Choosing just one pattern from 5 out of 4 Patterns wasn't as easy, but I decided I could probably get some good mileage out of the Nancy raglan (and yes, I snickered a bit at the pun in the name). I have been wanting a variety of raglan knit top patterns, and until this year there had been slim pickin's there. I figured I ought to get while the gettin's good.
I had enough on the gift "card" from Bella Sunshine Designs to get three patterns, so I now have the Reagan raglan (continuing the pun from 5 out of 4!), the Amelia top, dress, and maxi, and the Maggie top, tunic and dress.
Choosing at Wardrobe by Me wasn't easy, and I paid close attention to the sizing as the designer(s) is in Denmark. After quite a bit of dithering, I decided on the Aurora dress and tunic pattern.
I still have a $10 store credit to use at Striped Swallow Designs, but I used the code for the free pattern to get the Winter Park top. I am still quite undecided on what else to get, as there is more than one that has caught my eye.
Finally, from the hostess of the giveaway, I've picked two of the four free patterns from Itch to Stitch: the Brasov wrap top and the Chai shirt and dress.
Showing posts with label blouse. Show all posts
Showing posts with label blouse. Show all posts
31 October 2018
27 September 2018
Fitting notes for Simplicity 8243 blouse
It's been a busy week, and tomorrow is also busy, but I want to get these notes posted before I forget them. On the Simplicity 8243 blouse, when I googled for reviews (there were none on Pattern Review) I found just two: one from Tanya at CurvySewingCollective and one from a blogger who calls herself Seam Racer. I am honestly surprised this pattern is not more popular. It's been out for a while, and I bought it up in Chicago when Mom and I hit JoAnns the day before son's wedding. I think it ought to be more popular ... but then again, I tend to be very much out-of-step with most folks.
So, these fitting notes are for the blouse only:
So, these fitting notes are for the blouse only:
- Collar: I love the cut-on collar. Once I wrapped my mind around it and grokked the fullness, it seemed absolutely brilliant and I wondered why this technique isn't in common use for camp shirts, casual button-fronts, and of course Hawaiian shirts. I think I'll do the facing in a solid white next time I do up a for-reals shirt. Which brings me to:
- Shoulder pads: Apparently they aren't a "thing" right now, because I had to scour Goodwill's racks to find something to swipe the shoulder pads from. For some reason I thought I read they were big in the NY Fashion Week? Maybe that's the forecast one for spring ...? The only reason I pay *ANY* attention to that is because it affects my ability to get certain items. You know, like fancy or unusual sleeves ...
- Pleated sleeves! These are cute enough on their own, but the pleats really shine with shoulder pads.
- Back to the shoulder pads: I posted a thread on PR about how to back out the shoulder pad allowance, and Gloria came through like a real champ, even emailing a snapshot of one of her sewing books. I am going to give it the ol' Girl Scout try here, probably in that silly cherries cotton broadcloth I got in a FabricMart bundle and have been using for pockets on jeans when I run out of green shamrock fabric. (pic to follow)
- Length: The blouse is supposed to be tucked in, and tucked into high-waisted pants, but I like it untucked and so I'll lengthen it a bit to avoid my fishbelly-white belly playing peek-a-boo. Wouldn't want to blind anyone.
- Sleeve width: these are VERY close-fitting sleeves. While it doesn't impede my movement, they are a little too close for my comfort, so I am going to try widening them a bit in the cherries broadcloth experimental version.
- FBA: I did an inch-and-half FBA on this, so it does button without gaping, but looking at the pictures makes me think I need just a smidge more to eliminate the drag lines I see.
- Swayback adjustment: I didn't do anything to the back piece, and I am thinking of widening it a bit to add two fisheye waist darts to give it proper shaping in back.
This probably looks like a whole lotta things to do to the pattern, but I feel it's certainly worth it. This is a classy blouse, and I intend to keep playing around with it. Now, if I could just find which box has my rayon satin, then I'll make a seriously fancy blouse!
 |
| from Power Sewing by snapshot by Gloria |
21 September 2018
Simplicity 8243 blouse finished
I'll do a bunch more notes in a few days, but I wore it in to town yesterday and got pics when we got home, so I wanted to post them up here.
This top came out WAY fancier than I had envisioned. I was going for "cute and casual," but as you can see, it stepped over that standard. I had quite the time finding shoulder pads locally - finally decided to scour Goodwill's racks, and sure enough I found a red dress (probably poly) with red shoulder pads and a red long back zipper and even a cute bit of red lace across the front. Trust me, the blouse doesn't look right without the shoulder pads ... unless you adjust them out. That's another post.
 |
| Simplicity 8243 blouse, with arm down |
 |
| Simplicity 8243 blouse, with arm up showing the crease up near the shoulder pad |
 |
| Simplicity 8243 blouse, back view - no back shaping |
 |
| of course the front view picture is fuzzy - we just cannot have a photo session without an out-of-focus pic (or three) |
23 August 2018
Dreams and schemes for a mini wardrobe
Wearing my linen work jeans around the property for chores has made me want MORE! More linen work clothes! And then, right before a stronger-than-normal summer storm hit the other evening, inspiration hit me first.
For over a year now, my precious linen/cotton denim chambray has hovered near the top of the fabric piles, and sitting close to it in my imagination is of course Simplicity 8447, the Rosie the Riveter overalls, along with two blouses and the pants without the overall bib. I now intend to make the pants in a heavy linen from Fabrics-Store (in the patriot blue color), get those fit well, then the overalls, the regular blouse in a medium blue handkerchief linen I think I got from Fabric Mart more than a few years ago.
While I was pulling out the overalls pattern, I grabbed up Simplicity 8243, a 1940s sportswear pattern with a short sleeve blouse that caught my eye when Mom and I were doing some shopping the day after son's wedding up in Chicago. I have some red bandana paisley cotton from WalMart I think would be cute.
Today, the rules for the PatternReview.com mini wardrobe contest were posted, and it is work themed ... but you need 5 garments to create 6 looks. Oh, and all five must be cut and sewn between 1 September and 30 September. I hit on an idea for a fifth garment this afternoon, if it's ruled as a garment: Simplicity 4282, view C vest style apron, and I'll tweak the pockets to make it an egg-gathering apron. The pockets are more to the side, so I'll be able to scrinch down to get the egg laid in the smallest part of the corner of a tractor, because you know there's always one hen who must make it an obstacle course for you.
So, that's my inspiration and plans. Now the big question is: how long will it take me to sew all these up? Only one way to find out.
01 October 2016
Cashmerette 2101 Harrison shirt
OK, so I finished this shirt up last night, but it was still way too muggy and humid and warm to wear it for pictures. So, I finally stop sweating like a horse after morning chores (meanwhile, I took in just the inseam on my red jeans mockup #3, and BOOM it feels so much more right) and changed into the outfit, posed for hubby to take pics ... and hubby is 110% right about the colors being wrong for me. Ouch. I tried tweaking the colors in GIMP (free knock off of Photoshop) and there is just no fixing the color issue.
Either I am having a "fat day" today, or I messed up on the seam allowances (1/2 inch instead of the 5/8 inch the Big 4 use), or the sizing runs a smidge small. Or maybe a combination of the three - I'll find out when I make it again, because I WILL make it again. The measurement chart said I need a 16 E/F. Honestly, it does feel a bit snug in the shoulders - I blame all those push-ups I had to do as a mouthy private in the army. LOL
I had fun playing with the variations I did on the sleeves and collar, and I really wish it turned out better. Can't blame the pattern for the fabric coloring. The shirt looks great on the hanger - just not next to my face. And it really does look like I should try the size 18. I really do love the pattern, and I really love not needing to put a big honkin' FBA on it (and hope it turns out smoothly) right out of the envelope.
I'll let those thoughts simmer on a back burner while I get back to the jeans fitting. I looked at the periwinkle blue cotton twill this morning, and it's too lightweight ... but I do have a third piece of denim. It's only two yards, so I think I'll fold up six inches off the bottom for some capri length jeans. I have hand knitted socks to show off anyways!
 |
| Cashmerette's Harrison shirt |
 |
| back view of Cashmerette Harrison shirt |
I had fun playing with the variations I did on the sleeves and collar, and I really wish it turned out better. Can't blame the pattern for the fabric coloring. The shirt looks great on the hanger - just not next to my face. And it really does look like I should try the size 18. I really do love the pattern, and I really love not needing to put a big honkin' FBA on it (and hope it turns out smoothly) right out of the envelope.
I'll let those thoughts simmer on a back burner while I get back to the jeans fitting. I looked at the periwinkle blue cotton twill this morning, and it's too lightweight ... but I do have a third piece of denim. It's only two yards, so I think I'll fold up six inches off the bottom for some capri length jeans. I have hand knitted socks to show off anyways!
18 May 2011
Hubby and I dressed up in clothes I've made
One more pic ... the official pic of hubby and I before going into the banquet last night wearing a bunch of clothes I've made:
If you've read this blog even just a week, you know what I am wearing: B5355 tunic in silk charmeuse (yes, I was petting the sleeve hems during the speeches) and the Butterick 5221 knee-length shorts in linen.
Hubby's shirt is much older ... the first thing I sewed for him last year. It is Simplicity 7030 in an offwhite linen/cotton blend, and he still loves it because it is lightweight, cool, washable (he dripped chocolate sauce on the sleeve during dessert!), and best of all he picked out the decorative stitches and was able to ask for two pockets instead of the standard one.
I have to confess: yesterday afternoon as I was ironing hubby's shirt I was cringing. Ye-ouch ... it looks so sloppy to me now, but almost a year ago I was quite proud of it. When I remarked on this to hubby, his response was oh-so-predictable ... make him a better one! He'll still wear this one to tatters because he likes how it feels.
So, along with all my other want-to-sew-now projects, add in a new dress shirt for hubby ... and about four more casual shirts that I already have fabrics for.
 |
| dressed up in clothes I have sewn |
Hubby's shirt is much older ... the first thing I sewed for him last year. It is Simplicity 7030 in an offwhite linen/cotton blend, and he still loves it because it is lightweight, cool, washable (he dripped chocolate sauce on the sleeve during dessert!), and best of all he picked out the decorative stitches and was able to ask for two pockets instead of the standard one.
I have to confess: yesterday afternoon as I was ironing hubby's shirt I was cringing. Ye-ouch ... it looks so sloppy to me now, but almost a year ago I was quite proud of it. When I remarked on this to hubby, his response was oh-so-predictable ... make him a better one! He'll still wear this one to tatters because he likes how it feels.
So, along with all my other want-to-sew-now projects, add in a new dress shirt for hubby ... and about four more casual shirts that I already have fabrics for.
09 May 2011
Pics of me wearing Butterick 5355 in silk
First some gushing - this IS SILK CHARMEUSE, after all! (I believe the current exclamation is "Squeeee!!"). This fabric is so light and airy ... even a light breeze catches it:
It brings to mind the old joke: "Flap your wings and FLY!" As y'all can see, my hair is barely moving in the breeze ... and my hair is still baby-fine in texture. More views:
The pics show me how the side and back of this tunic look. I definitely have a case of "bra strap peekaboo" going on. If hand basting doesn't work tonight with bringing the neckline binding in enough, I will need to resort to small safety pins. The side view and windy pics are my favorites, as the angle of sunlight hits the fabric just perfectly.
Just a note: silk charmeuse is definitely a bad choice to use as a self-fabric sash. The sash slides against the body pieces and migrates from my underbust down to below my waist and back ... just as a I breathe or move! I keep petting this slippery sash ... and the hems ... because (duh!) it's silk charmeuse.
I also have to admit I am currently loving just how slimming this tunic looks ... before the pics I felt as though it was clinging to every lump and bump, but it instead is skimming over them and hiding them. Color me happy overall - in black, white, purple, and green!
 |
| wind catching silk sleeves |
 |
| B5355 front view |
 |
| Side view of B5355 - my favorite pic |
 |
| B5355 silk - now I know how the back looks |
Just a note: silk charmeuse is definitely a bad choice to use as a self-fabric sash. The sash slides against the body pieces and migrates from my underbust down to below my waist and back ... just as a I breathe or move! I keep petting this slippery sash ... and the hems ... because (duh!) it's silk charmeuse.
I also have to admit I am currently loving just how slimming this tunic looks ... before the pics I felt as though it was clinging to every lump and bump, but it instead is skimming over them and hiding them. Color me happy overall - in black, white, purple, and green!
B5355 silk tunic done? Maybe
So I bit the bullet (after spilling coffee on myself earlier) and attached the sash carriers and finished the neckline ... Pic first then commentary:
First up: using the sleeve casings was not a good idea. Bias binding would have looked much better. I may be able to pull victory out of the jaws of defeat ... right now a tiny thought from one of my two last working brain cells is whispering about handbasting embroidery thread around the top and gathering it in just enough to persuade it to lay flat against my neckline. Maybe this evening ... so if anyone wants to sound the "bad idea!" warning you have most of the day to do it.
I moved the sash carriers down from where the pattern has them marked ... and they still feel a bit high when I put it on. Or maybe I should have graded the hips out a little, considering I went down one size from the measuring chart.
Another observation: silk charmeuse makes a very poor self-fabric sash! Then again, the charmeuse would probably slide against fine grain sandpaper (might be an exaggeration) but I am thinking a sash made from a fabric that stays tied may have been a smarter choice. Despite this, I still like how it looks ... except that neckline. If my handbaste-and-gather idea works though, I will be pleased.
Final note: The neckline is still wide even with going down one size, and I will need to be careful about the bra straps playing peek-a-boo. I do like this pattern, so will probably make it again.
 |
| Butterick 5355 raglan tunic in silk charmeuse |
I moved the sash carriers down from where the pattern has them marked ... and they still feel a bit high when I put it on. Or maybe I should have graded the hips out a little, considering I went down one size from the measuring chart.
Another observation: silk charmeuse makes a very poor self-fabric sash! Then again, the charmeuse would probably slide against fine grain sandpaper (might be an exaggeration) but I am thinking a sash made from a fabric that stays tied may have been a smarter choice. Despite this, I still like how it looks ... except that neckline. If my handbaste-and-gather idea works though, I will be pleased.
Final note: The neckline is still wide even with going down one size, and I will need to be careful about the bra straps playing peek-a-boo. I do like this pattern, so will probably make it again.
B5355 progress pic
Maggie has shown great restraint in chat the past couple evenings, not "bugging" for an update pic on this Butterick 5355 silk charmeuse blouse ... so I thought I would throw her a bone (photo) as I have only two things left to do on this silk tunic: the neckline finishing and attaching the sash carriers. Here's Mathilda showing off my progress so far:
I am to the point where I will cry my eyes out if I hose things up. There is no picking stitches out of this silk, especially not with a 1.6 stitch setting! I abandoned the casings for the sleeves after noticing I could see the black through the white patches of the print (also the darker parts of the purple and green) so I intend to use the casings I sewed to finish the neckline. I like where the neckline is as cut and don't want to turn it down (not to mention, that is a pain in the *donkey* as I discovered on the hems).
Speaking of hems ... my hems aren't exactly even due to the slipperiness of the silk ... but if anyone can actually see that I will be asking her/him for tips!
Another cup of coffee to work up the nerve to place those sash carriers ....
 |
| B5355 in silk charmeuse - almost done! |
Speaking of hems ... my hems aren't exactly even due to the slipperiness of the silk ... but if anyone can actually see that I will be asking her/him for tips!
Another cup of coffee to work up the nerve to place those sash carriers ....
06 May 2011
New thread test SUCCESS!
Since I still wasn't quite satisfied with yesterday's thread tests for the silk charmeuse, I looked again at the thread section at Hancock (yes, hubby also included hitting Hancock as part of yesterday's anniversary outing). Something *shiny* caught my eye this time: Sulky viscose/rayon embroidery thread! They had two types, and I got the high quality one (after all, this IS for silk charmeuse) with the 943- in front of its SKU number.
I just finished a test on one of my few remaining scrap pieces, and am pleased. I have found the right thread for this project! Other than forgetting to trim the edge on the french seam, this one came out pretty much perfect:
If you click through to the larger image, the label on the spool came out in focus and is readable. I'm getting a better feel for pressing the silk charmeuse as well ... I just need to let the iron sit on top of the press cloth a little longer than other fabrics. Pictured is my best seam so far ... and it even looks like the thread smooths out a bit when pressed. Did I mention the rayon's shiny sheen closely matches the silk charmeuse's shine?
While exploring Hancock's thread section, I discovered the problem with the Gutterman cotton thread: I bought the wrong kind by accident. In our local Hancock, the 200m spools are handquilting thread. The 100m and 800m spools are for machine use ... strange. But it does explain the stiffness in the seams. I have moved this spool and what remains on the bobbin here to my desk where I do all hand sewing. The Gutterman machine cotton thread looked like it would probably work, but it didn't have the shine that the rayon thread does. "Shiny for the win!" as my hubby and son would say.
NOW I am finally ready to put this blouse together ...
I just finished a test on one of my few remaining scrap pieces, and am pleased. I have found the right thread for this project! Other than forgetting to trim the edge on the french seam, this one came out pretty much perfect:
 |
| Sulky rayon thread on silk charmeuse |
While exploring Hancock's thread section, I discovered the problem with the Gutterman cotton thread: I bought the wrong kind by accident. In our local Hancock, the 200m spools are handquilting thread. The 100m and 800m spools are for machine use ... strange. But it does explain the stiffness in the seams. I have moved this spool and what remains on the bobbin here to my desk where I do all hand sewing. The Gutterman machine cotton thread looked like it would probably work, but it didn't have the shine that the rayon thread does. "Shiny for the win!" as my hubby and son would say.
NOW I am finally ready to put this blouse together ...
05 May 2011
Scrap thread testing - silk charmeuse
Maggie is wanting in progress pics ... fair enough, since I did bug her about progress pics when she was working on her denim corset. LOL I waited more than 48 hours before bugging though .... but in her defense, she does have this same silk charmeuse so I can understand her interest in this project.
I spent yesterday testing thread, stitches, and practicing french seams on scraps of the silk charmeuse ... and I am starting to run low on scraps! I tried out different stitch lengths on my Brother CS-770 (my daily driver and delicate fabric machine) and decided 1.8 setting is too long as it starts to have a gathering effect on the finished seam (note: this may come in handy for the neckline). The 1.6 setting looks good - little puckering, but not the too short bulletproof look that begins to resemble perforation that the 1.4 setting started to look like.
Now, about the thread itself ... I had gone out and bought Gutterman cotton thread on Nay's advice, because she has done bridal work and sewn much more silk than I have (recall this is my first time sewing silk!). She verified in chat that I had the right thread by its color number, so that part was good ... the problem I am seeing is this thread seems too stiff for this silk charmeuse! Honestly, it has a "light boning" effect, especially on french seams (where it is sewn twice). So I tried what Gloria recommended: embroidery machine thread. While it still is stiffer than unsewn silk, the effect is noticeably less ... here is my *attempt* to capture this on pixels:
The stiff part shows, but the curve on the machine embroidery thread sample isn't as obvious. This is after trying to press both samples, as well. About that ... this silk charmeuse does not like taking a press. I should have guessed that when I laid it out and there was hardly any wrinkling even though I had to hide this fabric in a box to keep inquisitive and destructive felines away from it! I am using a press cloth (don't want any accidental marking of the silk from my more-than-a-decade-old iron) but am just not brave enough to try increasing the heat beyond the silk setting. I don't have enough left over to cut any new pieces. (Go ahead and call me chicken! LOL)
Now, for a little fun and fabric acquisition with little expenditure: here is the "to iron" pile on my ironing board, with my newest acquisition on top: the rayon floral Maggie mailed me left over after she made the very lovely classic keyhole tunic last week (that she hadn't worn as of last night!).
It's about 2 yards ... just enough for ME to make a classic keyhole tunic just like this one ... except in my size. Not only did I have fabric envy when she posted this ... I had finished garment envy, and since Maggie is iffy about this project I first had to find out what size she made. Maggie and I do not wear the same size ... I need a size 18 for my shoulders (too many push ups as a mouthy private in the army ...) so I couldn't trade for the finished tunic. If she ever gets over her "tablecloth fabric" idea and actually wears this lovely tunic she's made ... we'll have matching garments sometime this summer! Oh and fabric lovers ... fear not. This rayon floral is now in a truly loving home, where its beauty and classic print will be truly appreciated. Did I mention its even prettier in person? It has a second floral motif in subtle white-on-cream to go along with the very pretty pink themed roses that the camera doesn't pick up too well. Maggie is getting about 2-1/4 yards of my white handkerchief linen with a couple swatches ... the prop in the first pic. She hasn't been bitten by the linen-love bug ... yet ... but I am intending to fix that with a sample swatch of the FM couture linen (which I now own four colors of ... they're under the rayon in the to-iron pile).
I may not make much progress today, as it is our anniversary and hubby is taking me out (to include hitting Hancock!) once my clothes dry. I want to wear my simple skirt, a bright pink matching knit top, and my denim mid-Victorian corset.
I spent yesterday testing thread, stitches, and practicing french seams on scraps of the silk charmeuse ... and I am starting to run low on scraps! I tried out different stitch lengths on my Brother CS-770 (my daily driver and delicate fabric machine) and decided 1.8 setting is too long as it starts to have a gathering effect on the finished seam (note: this may come in handy for the neckline). The 1.6 setting looks good - little puckering, but not the too short bulletproof look that begins to resemble perforation that the 1.4 setting started to look like.
Now, about the thread itself ... I had gone out and bought Gutterman cotton thread on Nay's advice, because she has done bridal work and sewn much more silk than I have (recall this is my first time sewing silk!). She verified in chat that I had the right thread by its color number, so that part was good ... the problem I am seeing is this thread seems too stiff for this silk charmeuse! Honestly, it has a "light boning" effect, especially on french seams (where it is sewn twice). So I tried what Gloria recommended: embroidery machine thread. While it still is stiffer than unsewn silk, the effect is noticeably less ... here is my *attempt* to capture this on pixels:
 |
| Machine embroidery thread versus Gutterman cotton thread |
Now, for a little fun and fabric acquisition with little expenditure: here is the "to iron" pile on my ironing board, with my newest acquisition on top: the rayon floral Maggie mailed me left over after she made the very lovely classic keyhole tunic last week (that she hadn't worn as of last night!).
 |
| Floral rayon - It's MINE now!! |
I may not make much progress today, as it is our anniversary and hubby is taking me out (to include hitting Hancock!) once my clothes dry. I want to wear my simple skirt, a bright pink matching knit top, and my denim mid-Victorian corset.
13 January 2011
S2566 blouse in black
And here it is, the second blouse from the Simplicity 2566 pattern, done up in printed cheap cotton I've had for about a year:
 Not only does it fit Mathilda better ... it definitely fits me better! It's casual; it's cute; it's whimsical ... and boy did it turn out looking so totally 80s! It also needs a wash and press, which it will get once I have tonight's ensemble dryer-fluffed. My challenge for the next 5 hours: keeping my two lighter colored cats from shedding on the outfit! Both hubby and I will be wearing black pants, which the fur monsters find irresistible ...
Now that I've worked out the side dart FBA idea, and gotten a casual blouse as a result ... onward to hubby's cotton flannel plaid long sleeved shirt. I'm going to give McCall's 4518 for it, a casual camp shirt style with a facing instead of the collar band/stand. I used the other Palmer/Pletch unisex shirt to make hubby's parrot shirt, and he mentioned he doesn't care for the dropped shoulder on it, so I'll try this one and see how he likes it (beyond the cotton flannel aspect).

Now that I've worked out the side dart FBA idea, and gotten a casual blouse as a result ... onward to hubby's cotton flannel plaid long sleeved shirt. I'm going to give McCall's 4518 for it, a casual camp shirt style with a facing instead of the collar band/stand. I used the other Palmer/Pletch unisex shirt to make hubby's parrot shirt, and he mentioned he doesn't care for the dropped shoulder on it, so I'll try this one and see how he likes it (beyond the cotton flannel aspect).
12 January 2011
S2566 blouse FBA WIN!
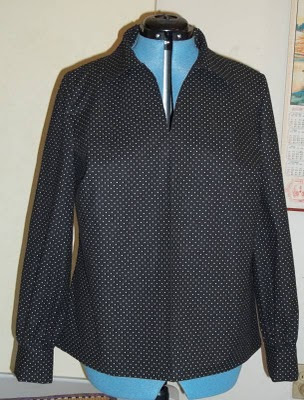
I know I mentioned a plaid shirt for hubby ... but I got the proverbial "wild hair" last night and went back to the side dart FBA on the Simplicity 2566 blouse. This time I am using a cute $1/yd cotton print, black with little white dots. The FBA failure has been bugging me, especially with the vest now finished.
Between my last two working brain cells, and discussions with sewists who know more about darts than I do, I decided to leave the dart legs as they were and start pulling the dart point towards the inside by an inch. The dart started to look more normal:
 It might look more normal, but it is still outside the strike zone on me - still low and outside, though not nearly as bad. So this morning, I unpicked the dart and brought the dart points inside by another half inch:
 This time, it was just right! Now that I've discovered "right" via ye olde tryal and err method (Shakespearean spelling for effect) I will trace off the blouse front piece to the red dot stuff ... and while I'm at it, measure the width versus length, because I suspect there is a ratio at play here. If I can nail down an actual ratio, then future side dart FBAs should be less trial-and-error and a little more methodical. Plus, I am still a geek at heart ...
Some of y'all might notice the original darts ... they don't change shape at all. Margaret over at PR pointed that out to me ... guess that is something to keep in mind when messing with darts in general. Perhaps the pattern grading software thinks boobs get smaller as the body gets bigger? HA!
Now, to top of the "I win!" feeling this morning - I finally got a good pic of the buttons on my vest! These beautiful shiny buggers are a royal PITA to photo ... but after several deleted attempts:
 I'm of the opinion these buttons elevate the vest and blouse from "really nice" to "AWESOME!" ... FBA mistake on the blouse notwithstanding.
Now to cut out the back, collar, and sleeves in the black and white dotted cotton for a cute whimsical blouse ... just for the fun of it.
Between my last two working brain cells, and discussions with sewists who know more about darts than I do, I decided to leave the dart legs as they were and start pulling the dart point towards the inside by an inch. The dart started to look more normal:


Some of y'all might notice the original darts ... they don't change shape at all. Margaret over at PR pointed that out to me ... guess that is something to keep in mind when messing with darts in general. Perhaps the pattern grading software thinks boobs get smaller as the body gets bigger? HA!
Now, to top of the "I win!" feeling this morning - I finally got a good pic of the buttons on my vest! These beautiful shiny buggers are a royal PITA to photo ... but after several deleted attempts:

Now to cut out the back, collar, and sleeves in the black and white dotted cotton for a cute whimsical blouse ... just for the fun of it.
11 January 2011
S2566 blouse and vest
The buttons are on and the vest is finished! I managed to persuade my teenage son to take pics, and he insisted I try everything on for Thursday evening. Since I only have a little over 48 hours until the banquet, I won't get black slacks done up, so I will be wearing brand new black jeans with the blouse and vest ... but I am quite pleased with how this turned out overall. Especially my first attempt at plaid matching. First, the back view:
 Hmm, little bit of pooling in the small of my back ... looks like I might need to learn the swayback adjustment next ... after I nail down the FBA idea, of course. Now, about that FBA:
 It buttons over my boobs without gapping or pulling! That alone is a victory for me. I'll need to refine my shaping skills, as I have a bit of gapping at the armhole ... but it's also possible I unintentionally pulled the fabric. Guess who skipped the staystitching again?
I have plenty of room in the waist, even without curving my seams outward on the sides seams. Since I had to wait for my son to finish his breakfast, I've been wearing it for a good 20 minutes and moved around and even tied back my hair while waiting, so I know for sure I have freedom of movement in this.
Overall, I like this pattern. Once I get the blouse's side dart FBA just right, I'll trace this one off onto the red dot stuff so I can use it more. I probably won't need too many vests like this, but a summer one could come in handy for son's end of year awards functions.
Next up in the "to sew" list: cotton flannel long sleeved shirt for hubby ... in plaid. LOL
06 January 2011
S2566 blouse cuff detail
While still trying to pry my eyes open (with the help of coffee, of course) I decided to try to capture on pixels the buttons on my blouse cuffs. I did resist the urge to add a button to the neckline, so this one has six small buttons on the cuffs, 3 per side. It took me four tries, and pinning the sleeve up to try to catch the light ... but I not only have a decent representation of these goldtone/silvertone filligree buttons ... I have finally managed to capture the textured weave of this lovely fabric I rave about!
 I have a feeling this is as good as it will get for trying to photograph the buttons ... and it isn't hanging right because the sleeve is pinned up ... but now y'all can see why I love this solid white dress shirting. :)
Moving onwards to the vest now ... I've located all four pattern pieces. This vest has princess seams in both front and back, and I am leaving the optional back waist belt off because the plaid should be busy enough on its own. I shouldn't need to fuss with the back princess seams, but now it's time to review my notes on doing a princess seam FBA and give it a go ... on the lining first!
Speaking of the plaid ... should I try to match the plaid at the top of the princess seam, or the bottom? Right now I'm leaning towards matching the lower part of the princess seam so it's matched (hopefully!) all around my midsection. Feel free to leave an opinion, as I'll be busy with the pattern and lining for a day (or three ...) or so, depending on how successful I am with the FBA idea on this one.
Now, more coffee, then it's time to break out my colored ink pens.
05 January 2011
Here she is ... S2566 blouse done!
Well, except for handsewing the shank buttons on ... but given how the cuffs sit they won't show in a regular Mathilda the dressform pic. It could probaly benefit from another press, but I will be adding new wrinkles as I put the buttons on in all likelihood.
 Except for the goofy dart "sidecars" I am quite happy. I won't model it myself until after the vest is done because of the dart shaping issue (and a good dose of vanity) so Mathilda will have to do for the next 3-5 days.
Now, here's a gem for my "Thank you, Sgt Obvious!" file. Irons heat up so much faster when they are plugged in. I wouldn't lie to y'all LOL
As I expected, putting the buttonholes in was a pain in the (*donkey*) due to how close-fitting the cuffs are. I also discovered the fabric can catch the little lever-thingy on my 1-step buttonhole and make it change directions before it ought to.
The instructions called for slip stitching the hem ... errr ... that's hand sewing, right? Something I don't care for, and don't have the patience to do. Props to those who do, but that isn't me. Especially with a deadline for this outfit. There's no getting around the handsewing of shank buttons, but I'll skip on the handsewn hem idea.
S2566 blouse - one sleeve on!
Rolling along (despite the FBA failure) with my dress white blouse: I have one sleeve complete except for buttons and buttonholes. I'll do those last since there is no easy way to put the buggers on with such a close-fitting cuff. Here's the pic, pixels hot off the mem card:
 I am very pleased with the sleeve. The top seam where the sleevecap joins the shoulder hits just perfectly on me: about 1/4 inch to the outside of my shoulder point. Yes, I tried it on in front of my mirror before dressing Mathilda and snapping a pic. I had some qualms about how easy it would be to get on since the body is so close, but it slipped right on with no fuss.
Gathering my fabric - especially at the cuff - was a royal pain in the (*donkey*). This lovely crisp dress shirting does not like to gather ... but once it does it looks great! :) I'm also pleased I managed to lay the cuffs perfectly on the (visible) grainline. Considering how long I spent laying out the pieces, I guess they should, but there have been a couple projects where I didn't get the grainline right before.
The cuff opening is on the backside of the wrist ... not the seamline. This is the first time I've encountered it (in my whopping 16 months of sewing LOL) and I am wondering if this will twist less than ones on the seam?
The dart "sidecar" is even more obvious with the sleeve attached, so this shirt will most definitely not be worn without the vest or a bodice. Because everything else is perfect to my tastes, I will make this again ... once I get the side dart FBA idea wrestled down and right.
Now, on to the other sleeve ... cuff first.
04 January 2011
FBA Fail!
I just finished up the neckline, collar, and resewed the side seam ... and tried my blouse-in-progress on. Nope, not gonna take a pic of it. My first real-world attempt at a real FBA has failed ...
I have enough room for my boobs, but the problem is the shape of the side darts. They're ... pointy. And they don't even point to the bust apex, directly. They point to a spot about and inch and a half to the outside of the bust apices. I will NOT be able to wear this shirt by itself, although I will still be able to wear it underneath the planned vest. Bah! It almost looks like my boobs have sidecars. For the record, I am wearing the same bra as when I drew it a couple days ago.
My last two working brain cells are saying I made the dart too shallow, and while I can leave the dart legs as they are, I need to pull the dart point an inch towards the center. You can probably see it on my dress form pic in the previous post ... which I had attributed to my dress form being less busty than I am.
One thing I have noticed is this blouse is rather close-fitting. The pattern envelope doesn't show a pic of the blouse without something over it: tie, vest, jumper ... and this might be why. From my experience with my Renn garb, I don't consider this a flaw. I just thought it deserved a mention.
Another thing: I did not think this fabric would be semi-sheer, but the facing and darts show right through as even more white than the single layer areas. Sleeves, cuffs, and hem still to do ... then I get to try my hand at an FBA for a princess seam. Hopefully I'll have better luck there -- but I will definitely cut out and assemble the lining first!
Any tips or corrections on this side dart FBA error?
Simplicity 2566 blouse in progress
I finally got a pic of the in-progress stage of my blouse last night at about 11 PM, after I went ahead and pressed the collar and keyhole neckline. I had a pic of it prior to pressing, but just couldn't bring myself to posting it. Here's how she sits on my small-busted dress form:
 I still haven't figured out how to pad out my dressform's (Mathilda LOL) bust without sacrificing a bra that fits. I also need to figure out how to pad out her backside/derriereire before I can say she's a decent body double for me.
I was a bit steamed last night, cussing when I got to the keyhole part in steps 7 & 8 because in step 2 Simp has you sew the side seams. Don't do this until the neckline is done! I ripped out one side seam (it isn't resewn yet), saying quite a few bad words as I did because I did NOT want to do any seamripping on this fabric. Thankfully, the fabric held up very well ... but the annoyance factor of needing to rip out a perfectly good seam always gets to me.
To finish this up today, I need to topstitch the keyhole area, finish the collar, tack the facing to the shoulder seam allowance on the inside, then do up the sleeves, cuffs, and hem.
It's do-able, but I'll need more coffee first. This morning hubby went back to work after two weeks of leave, so when his alarm went off at zero-dark-stupid the big fat fluffy cat decided we should both wake up for the occasion. It's (bleep)in' difficult to shove a 30 lb cat off the bed when he has you pinned under the covers and you're half-asleep.
03 January 2011
Blouse construction begins
Not much to take any pics of yet, but everything is cut out for the fabric and the interfacing, and the interfacing is fused to the collar, cuffs, and facing.
I put this into my WIP over at PR already, but thought I would expand and wax poetic a bit here: I LOVE this blouse design! It is just a very basic collared keyhole neck blouse, but this allows the focus of the garment to be on other things like:
I'm toying with the idea of adding a button and buttonloop to the top of the keyhole cutout. I doubt it's necessary ... but this is most likely my innate desire to embellish in full gear. I am so far resisting the temptation to use a decorative stitch on the collar, cuffs, and neckline ...well, I might use the faux quilting stitch that I used for topstitching the coats last month, but I am trying very very hard to not get carried away and to remember the main concept of this blouse: focus on fabric, buttons, and the vest.
I put this into my WIP over at PR already, but thought I would expand and wax poetic a bit here: I LOVE this blouse design! It is just a very basic collared keyhole neck blouse, but this allows the focus of the garment to be on other things like:
- Elegant fabric - and I have that in spades with this project :) I could also see a lovely or even wild print being effective here.
- Pretty buttons at the cuff - one of those subtle but nice details, and even though the buttons are as uncooperative as the fabric when it comes to my pictures, I definitely have this one to my satisfaction.
- A focal accessory - the pattern lends itself well to having a very nice scarf ... or the vest from the pattern, which is what I intend to make next in the Black Stewart dress plaid wool that is no longer listed at FM, with matching pretty buttons down the front.
I'm toying with the idea of adding a button and buttonloop to the top of the keyhole cutout. I doubt it's necessary ... but this is most likely my innate desire to embellish in full gear. I am so far resisting the temptation to use a decorative stitch on the collar, cuffs, and neckline ...well, I might use the faux quilting stitch that I used for topstitching the coats last month, but I am trying very very hard to not get carried away and to remember the main concept of this blouse: focus on fabric, buttons, and the vest.
Subscribe to:
Posts (Atom)