Showing posts with label FBA. Show all posts

27 September 2018

Fitting notes for Simplicity 8243 blouse

It's been a busy week, and tomorrow is also busy, but I want to get these notes posted before I forget them.  On the Simplicity 8243 blouse, when I googled for reviews (there were none on Pattern Review) I found just two: one from Tanya at CurvySewingCollective and one from a blogger who calls herself Seam Racer.  I am honestly surprised this pattern is not more popular.  It's been out for a while, and I bought it up in Chicago when Mom and I hit JoAnns the day before son's wedding.  I think it ought to be more popular ... but then again, I tend to be very much out-of-step with most folks.

So, these fitting notes are for the blouse only:

  • Collar: I love the cut-on collar.  Once I wrapped my mind around it and grokked the fullness, it seemed absolutely brilliant and I wondered why this technique isn't in common use for camp shirts, casual button-fronts, and of course Hawaiian shirts.  I think I'll do the facing in a solid white next time I do up a for-reals shirt.  Which brings me to:
  • Shoulder pads: Apparently they aren't a "thing" right now, because I had to scour Goodwill's racks to find something to swipe the shoulder pads from.  For some reason I thought I read they were big in the NY Fashion Week?  Maybe that's the forecast one for spring ...?  The only reason I pay *ANY* attention to that is because it affects my ability to get certain items.  You know, like fancy or unusual sleeves ...
  • Pleated sleeves!  These are cute enough on their own, but the pleats really shine with shoulder pads.
  • Back to the shoulder pads: I posted a thread on PR about how to back out the shoulder pad allowance, and Gloria came through like a real champ, even emailing a snapshot of one of her sewing books.  I am going to give it the ol' Girl Scout try here, probably in that silly cherries cotton broadcloth I got in a FabricMart bundle and have been using for pockets on jeans when I run out of green shamrock fabric. (pic to follow)
  • Length: The blouse is supposed to be tucked in, and tucked into high-waisted pants, but I like it untucked and so I'll lengthen it a bit to avoid my fishbelly-white belly playing peek-a-boo.  Wouldn't want to blind anyone.
  • Sleeve width: these are VERY close-fitting sleeves.  While it doesn't impede my movement, they are a little too close for my comfort, so I am going to try widening them a bit in the cherries broadcloth experimental version.
  • FBA: I did an inch-and-half FBA on this, so it does button without gaping, but looking at the pictures makes me think I need just a smidge more to eliminate the drag lines I see.
  • Swayback adjustment: I didn't do anything to the back piece, and I am thinking of widening it a bit to add two fisheye waist darts to give it proper shaping in back.
This probably looks like a whole lotta things to do to the pattern, but I feel it's certainly worth it.  This is a classy blouse, and I intend to keep playing around with it.  Now, if I could just find which box has my rayon satin, then I'll make a seriously fancy blouse!
from Power Sewing by Nancy Zieman Sandra Betzina, 1993 edition
snapshot by Gloria


03 January 2012

First fitting muslin B5662 corset

I actually sewed this up and had hubby snap these pics before we road-tripped to Florida, but I needed time to review the pics and persuade my last two working brain cells to think on them.  One thing I did not need those brain cells for was to appreciate how much it helps to use striped fabric for a fitting muslin!  This is especially true when fitting corsets.

Quick review: I cut the Butterick 5662 fitting muslin out of lightweight striped cotton (more on this in a minute) and out of the eight panels, four were sized.  I cut a size 14 for the front panel, and used size 12 for the other three ... remember the measurement chart says to cut either a size 18 or 20.  Here are the results, with just the fitting muslin, a zipper, and lacing panels cannibalized off an old attempt at a corset.
B5662 first fitting muslin - front
LOVELY shaping to this pattern!  Since I didn't bother even taping cable ties to it, I am indeed holding the top up.
B5662 first fitting muslin - back
 Oops ... that is definitely not an even lacing gap.  Pattern alteration time ...
B5662 fitting muslin - side
Here is another challenge: the side seam should be vertical, but pulls forward.  The whole side seam is too forward, but it's particularly noticeable at the top ... so like most patterns I will need to "FBA" this pattern.  There's also a pull-forward at the waist, although the hips section below the waist doesn't look as bad.  I think I will try sizing the front one of the side panels up to a 14, but leave the back one and back-center at size 12, then add to the top of the two front-middle panels that are not sized on the pattern.

Okay, just a little note on this: hubby pulled it way too tight when he laced me up in back, and if you look at the front pic closely you can see where the fabric at the seams is starting to pull apart.  I guess he got used to me doing fitting muslins in canvas.  No big deal, since I need to make another, but I may dig up a striped home dec fabric for the next round of fitting this corset pattern.

My goals for the next round in the fitting stage are to get an evenly spaced lacing gap in back while moving the side seam to where it belongs.

20 June 2011

WHAT is this fit problem?

So, today is a DD cup day for me (yes, it does fluctuate) and I pulled the floral tunic back out to try on with the different bra.  Still has fitting issues around the bust.  Still should have FBAed it.  So, I then grabbed the black-white dotted blouse from January where I felt happy with the FBA ... and discovered it has the same problem as my tunic.  Then, I pulled out my rayon challis tunic from last summer - which I was happy with at the time - and this one has the same problem as well!

Since I don't know if this fitting problem has a name, I went into GIMP and spent a good half hour marking up on of the pics from yesterday that shows the problem pretty clearly.
Fitting issue that FBA doesn't fix - What is this?
Be sure to click through to the larger version.  In blue are the seams: dart, side seam, and armscye.  In red are those annoying wrinkles.  In yellow is the main issue: I don't have enough fabric between my bust apex and the armscye.  In purple are my questions: are the wrinkles below the dart related?  What is this problem called?  And most important, how can this be fixed on anything other than a shoulder princess seam??

I am quite stumped ... and not even knowing if there is a specific term for this problem makes it pretty impossible to go searching for answers.  Help!?!

I'm going to start a thread for this in the fitting section over at PR's message board ... but if those of y'all who have more readers (or even a different set of readers) who might know, I would be extremely grateful if you could send them this way.  You even have my explicit permission to post this picture (unaltered) on your own blogs if it might help.  (Edit: Here's the thread.)

If I am ever going to get a good fitting top, I need to get this issue resolved.

19 June 2011

I should have FBAed

Hubby just snapped some new pics, this time without bright sunlight.  Even though as I sit here I can pull plenty of room in the bust of this tunic out in front of me ... the pics can't be lying.  It isn't hanging right over my bust.
B4856 front pic 1 ... not so obvious

B4856 front pic 2 ... now it's obvious I need an FBA

B4856 side pic ... the sideseam slit and definitely need an FBA
*Loud audible sigh*  While I know some women pay a lot of money to have a DD/DDD bust ... it really is a nuisance to fit properly!  I'd much rather go back to being a C cup.

12 January 2011

S2566 blouse FBA WIN!

I know I mentioned a plaid shirt for hubby ... but I got the proverbial "wild hair" last night and went back to the side dart FBA on the Simplicity 2566 blouse.  This time I am using a cute $1/yd cotton print, black with little white dots.  The FBA failure has been bugging me, especially with the vest now finished.

Between my last two working brain cells, and discussions with sewists who know more about darts than I do, I decided to leave the dart legs as they were and start pulling the dart point towards the inside by an inch.  The dart started to look more normal:
It might look more normal, but it is still outside the strike zone on me - still low and outside, though not nearly as bad.  So this morning, I unpicked the dart and brought the dart points inside by another half inch:

This time, it was just right!  Now that I've discovered "right" via ye olde tryal and err method (Shakespearean spelling for effect) I will trace off the blouse front piece to the red dot stuff ... and while I'm at it, measure the width versus length, because I suspect there is a ratio at play here.  If I can nail down an actual ratio, then future side dart FBAs should be less trial-and-error and a little more methodical.  Plus, I am still a geek at heart ...

Some of y'all might notice the original darts ... they don't change shape at all.  Margaret over at PR pointed that out to me ... guess that is something to keep in mind when messing with darts in general.  Perhaps the pattern grading software thinks boobs get smaller as the body gets bigger?  HA!

Now, to top of the "I win!" feeling this morning - I finally got a good pic of the buttons on my vest!  These beautiful shiny buggers are a royal PITA to photo ... but after several deleted attempts:
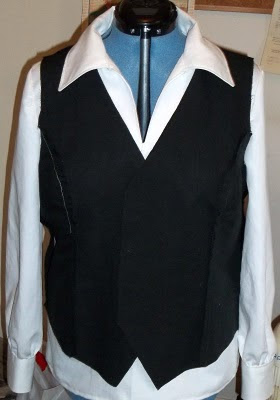
I'm of the opinion these buttons elevate the vest and blouse from "really nice" to "AWESOME!" ... FBA mistake on the blouse notwithstanding.

Now to cut out the back, collar, and sleeves in the black and white dotted cotton for a cute whimsical blouse ... just for the fun of it.

09 January 2011

S2566 vest lining done

I just sewed up the vest lining, and tried it on with hubby's assistance to hold the side seams together ... and it looks like I not only got the princess seam FBA right, but my "curve the seams out on the princess seams" strategy to bring the waist out from fitting a 32" to fitting my 35" waist worked!  I've done my little happy dance, and dressed up Mathilda for a pic:
Check it out ... Mathilda is stylin' now!  Just a note, I didn't baste the side seams together since I had two extra hands when trying it on, so the sides are open in this pic.  Since black just will not photo properly, here is a different version of this same pic, run through GIMP and with adjusted levels:

Now you can see the seams, and where I didn't quite ease the curve right on the bust LOL.  For those with GIMP, look under "Colors" then select "Levels" and compress the input range to the left by quite a bit to get the same effect.

Time for me to take a deep breath, toss my Stewart plaid wool in the dryer with a warm damp towel ... then cut out the vest in it!  It's both exciting and scary.

08 January 2011

Plaid wool vest with FBA started

Coffee ... this is definitely a "need coffee" morning, with evil white stuff on the ground when I woke up this morning.  I discovered I left my iron on overnight (eek!) so the braindeadness must have started last night.

I did snap an official "start" pic for the vest last night, and played with settings in GIMP until the plaid looked like it does in real life.  A dark plaid is so difficult to photograph properly!
The background of the plaid is black, with yarns of white, yellow, blue, green, and red woven though it ... so lovely in person, and the wool is so soft to the touch.  With the goldtone filligree buttons it should be just awesome ... or at least that is my plan.

Maggie bought some of this wool from FM after I raved about it ... then chided me for understating how it is!  She's done a review of her garment, but not blogged it just yet (that's a hint, maggie!) ETA: now blogged.  I know she spent a couple nights fussing with the waistband, and says she isn't quite happy with it ... but all she needs is a matching vest (or a straight red vest, if you ask me) and an untucked blouse and no one will ever know about her waistband woes.

Right now, I am declaring a tentative victory on the princess seam FBA idea ... I will wait until I have both front pieces and the back done up before declaring a full victory, as up until I got the body done on the blouse I had thought I had that FBA right.  I'll baste the side seams (probably in white for easy unpicking) and try it on to be absolutely certain before I go anywhere near the plaid wool with scissors.

Oh - I am not sewing this vest with black thread.  I know from my previous use of this linen/cotton (the short gaucho pants from the summer) that it ravels just from regular handling while sewing ... there is no way it would hold up well to much seamripping, especially not black thread on black fabric.  The stitches when done in black are really REALLY extremely difficult to see unless in direct sunlight ... yes this is the voice of experience speaking.  So, I am using a very dark green thread, which I can see by the Ott-light if any seamripping will be necessary.  Do I dare to hope for no further ripping other than the white thread?

07 January 2011

Simplicity 2566 vest - princess seam FBA

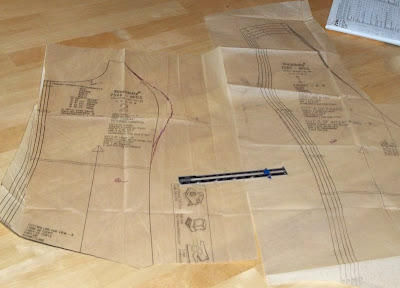
Deep breath ... here I go on the princess seam FBA idea!  Since Simplicity 2566 also has a jumper that uses the same four bodice pieces as the vest .... and I'm still debating the idea of doing this jumper.  I first had to decide how to handle the cutting lines.  I decided if I do make the jumper, I will just tape the bottom back on ... so I cut along the vest's cutting line carefully and folded the rest up neatly.

Then, I held up the front piece to myself to find *my* bust apex and marked it, then lined up the side piece and marked the apex out in the side.  Subtract the amount on the front panel ... and (I think) that should give me how far out I need to extend the side piece, minus seam allowance.  Here's what I have so far:
Wow ... that's out there pretty far.  I tried to smooth the lines a bit, as it just looked funny on first draw.  A closeup:

If it's too big, I can always take it in ... but it's much more difficult to add to one that is too small.

Simplicity seems to believe that someone with size 18 shoulders ought to have a 40 inch bust ... mine wibble-wobbles between 42-43 inches depending on water retention.  Of course, Simplicity's measurement chart also says I should have a 32 inch waist while mine varies between 34.5 and 36 inches - again depending on water retention - so I may need to add to the waistline, which I had to mark on the side piece.  Oddly, there is no finished garment measurement for the waistline, although the bustline finished measurement is printed on both the pattern and the envelope.

If anyone more experienced at a princess seamed FBA sees a major mistake here, please post up a correction!  Meanwhile, I should root around for some lunch, then pull out my linen/cotton to start this experiment on the intended lining fabric.

06 January 2011

S2566 blouse cuff detail

While still trying to pry my eyes open (with the help of coffee, of course) I decided to try to capture on pixels the buttons on my blouse cuffs.  I did resist the urge to add a button to the neckline, so this one has six small buttons on the cuffs, 3 per side.  It took me four tries, and pinning the sleeve up to try to catch the light ... but I not only have a decent representation of these goldtone/silvertone filligree buttons ... I have finally managed to capture the textured weave of this lovely fabric I rave about!
I have a feeling this is as good as it will get for trying to photograph the buttons ... and it isn't hanging right because the sleeve is pinned up ... but now y'all can see why I love this solid white dress shirting.  :)

Moving onwards to the vest now ... I've located all four pattern pieces.  This vest has princess seams in both front and back, and I am leaving the optional back waist belt off because the plaid should be busy enough on its own.  I shouldn't need to fuss with the back princess seams, but now it's time to review my notes on doing a princess seam FBA and give it a go ... on the lining first!

Speaking of the plaid ... should I try to match the plaid at the top of the princess seam, or the bottom?  Right now I'm leaning towards matching the lower part of the princess seam so it's matched (hopefully!) all around my midsection.  Feel free to leave an opinion, as I'll be busy with the pattern and lining for a day (or three ...) or so, depending on how successful I am with the FBA idea on this one.

Now, more coffee, then it's time to break out my colored ink pens.

04 January 2011

FBA Fail!

I just finished up the neckline, collar, and resewed the side seam ... and tried my blouse-in-progress on.  Nope, not gonna take a pic of it.  My first real-world attempt at a real FBA has failed ...

I have enough room for my boobs, but the problem is the shape of the side darts.  They're ... pointy.  And they don't even point to the bust apex, directly.  They point to a spot about and inch and a half to the outside of the bust apices.  I will NOT be able to wear this shirt by itself, although I will still be able to wear it underneath the planned vest.  Bah!  It almost looks like my boobs have sidecars.  For the record, I am wearing the same bra as when I drew it a couple days ago.

My last two working brain cells are saying I made the dart too shallow, and while I can leave the dart legs as they are, I need to pull the dart point an inch towards the center.  You can probably see it on my dress form pic in the previous post ... which I had attributed to my dress form being less busty than I am.

One thing I have noticed is this blouse is rather close-fitting.  The pattern envelope doesn't show a pic of the blouse without something over it: tie, vest, jumper ... and this might be why.  From my experience with my Renn garb, I don't consider this a flaw.  I just thought it deserved a mention.

Another thing: I did not think this fabric would be semi-sheer, but the facing and darts show right through as even more white than the single layer areas.  Sleeves, cuffs, and hem still to do ... then I get to try my hand at an FBA for a princess seam.  Hopefully I'll have better luck there -- but I will definitely cut out and assemble the lining first!

Any tips or corrections on this side dart FBA error?

02 January 2011

Changing my mind - S2566 blouse

I have realized my dragging (*donkey*) on the slacks is a lack of enthusiasm, so with all the fabric cut - but not the interfacing - I am going to switch gears to something I do feel a lot of enthusiasm for: the blouse and vest from Simplicity 2566.  I'll start with the blouse, as the only thing new on this project will be a real FBA.

I've been productive this morning, reviewing the bust adjustment class notes from PR and trying my first real FBA (as opposed to cheater half-methods because I didn't understand why I was doing what and how).  I have to knock off to go pick my son up from the Crashville airport, but this is what I've accomplished on tissue fitting and redrawing:

Those of y'all who do this alteration regularly probably notice a minor problem in the first pic: I forgot to put some paper under the pattern piece to tape and redraw LOL  It worked out though, with me slipping extra bit of tissue paper in the gaps and taping it down.  Redrawing the dart was a bit of a challenge, but from folding the tissue and holding it up to my body I *think* I have it right.  I'll know in a day or so when I put this blouse together.

And now, a little snapshot of my button haul from yesterday.  The shiny globs in the lower right of the pic are the buttons for the vest and sleeve cuffs, and being shank buttons they basically laid every which way except the most photogenic:
They are goldtone filligree with the outer shell in silvertone, which frames the goldtone filligree so nicely.  Hopefully they will behave for the vest picture when I get to that point ... I would love to be able to show y'all just how pretty they are.  Each sleeve cuff will have three small buttons, and the vest takes six, if I recall correct.

The rest of the buttons are for my 2011 year-long coat project.