Showing posts with label M4861. Show all posts

03 July 2011

Unexpected sewing gift for Mom

This is above and beyond the bag of scraps I would have snuck into Mom's house (and conveniently "forgot" to take back with me).  For the record, Mom not only liked the cotton scraps I brought her, but also wants the purple cotton flannel scraps I forgot to stuff into the bag as well.

After having little sister try on my denim Victorian corset in the morning ... and having her want one of her own (that should have been my warning) ... I migrated over to Mom's house to spend the night there.  I had Mom try the denim Victorian on as well, and despite it not being fitted to her body shape she decided it wasn't uncomfortable (big warning sign) like she had thought up to that point.  Part of the try-on for both was showing them how to get in and out of it.

The next morning, Mom asked about the waist corset and how it was different from the overbust.  I figured the easiest way to explain would be to let her try on the waist corset ... it didn't come back off Mom until after two hours of sorting through the old boxes, and the main reason Mom took it off after that was because we worked up a sweat and she wanted to let it dry.  At this point, I had already told her it was now hers.  She put it back on for pics later in the afternoon:
Mom in M4861 front (I rolled the front)

Mom insisted a side view be included to show how the curve up fits

M4861 from the back, showing why we call it a pretty backbrace
The number one reason this is now Mom's backbrace?  It fits her better.  What I had thought was just sloppy patterning is actually a fitting issue: Mom has a longer back waist length than I do, by almost two inches, and the M4861 does not slide up or down on her at all ... even after two hours of rooting through old boxes and lifting.  Mom also declared it is more comfortable than the backbrace she got from her chiropractor ... not to mention it looks better.

Given all this, how could I have NOT gifted it to her?  Like the tops I gifted to little sis, this waist corset fit Mom perfectly.  I'm just glad the denim Victorian didn't fit either one well ... after all, I did spend ten days fitting it to ME!  However, the denim corset inspired Mom to look through Jill Salen's Corsets book with me, and she wants a "Pretty Housemaid" one (page 58) because it is lighter boned to allow more movement as it was marketed to working women in the 1890s.

13 April 2011

M4861 first attempt: My Blue Monstrosity

OK, I will stop procrastinating now ... if only to avoid a lynching in chat tonight.  There are more folks asking to see these pics than just Val - even though Val was the one who earned these pics by completing the corset challenge.  Just so no one can say I didn't warn y'all ...
*** WARNING! *** WARNING! *** WARNING! ***
Not even my bad photog (lack of) skills can hide this ugliness!

In my defense, I made this over 14 months ago, while commuting to clinicals, in pain, tired, and desperate for something to use as a backbrace ... and it was my first stab at a "real" corset.

*sigh* I guess there is just no getting around posting these pics of what I now call the Blue Monstrosity (and mean it!).


There is no actual boning in this, just hemp craft cord.  It was actually pretty comfortable to wear ... UNDERNEATH my scrubs.  There are both antiqued brass and silver eyelet pieces, for those wondering if the camera flash is fooling with your eyes.  I used home dec scraps, which in retrospect wasn't the best idea for a pattern with a total of four bias seams on it.  I also didn't do a fit muslin ... this pattern runs large ... but perhaps I can call the Blue Monstrosity my full mockup instead?  Especially since I made another (better looking and better constructed!) backbrace this past December.  Hmmm, now there's an idea to salvage my pride and sweep the broken feet of clay back together ...

Aother way of looking at it came from the pink-hating Cat the other night in chat.  Comparing my latest denim mid-Victorian to last spring's Elizabethan, she said she can see a huge improvement.  So maybe I can show my age and spin it as "You've come a long way, baby!"

Or maybe I should just burn it ....

12 April 2011

Val completes the corset challenge

I'm sure some of y'all recall when I issued the corset challenge to Val ... a couple of y'all (like me) have been following her progress when she pops in to chat.  She finished it Sunday evening, and showed me pictures of her work last night.  Keep in mind, this is Val's very first corset, and she used McCall's 4861 view E, which is also the pattern I used to make my first corset that I now call "the blue monstrosity".  Here are her results:


Val followed the pattern instructions (the ones I ignored! LOL) and also made it in two halves with lacing in the back as well as front, per the instructions.  Since Val doesn't have a blog, feel free to post up your comments here, and I will be sure she sees them.  My comment: she has put my first corset to shame ... complete shame.

Speaking of that corset ... I now need to dig up the infamous blue monstrosity as promised and hold up my end of the deal by showing the sewing blogosphere just how ugly it really is.  This is going to be painful to my pride ... but I am the one who "opened her mouth" in chat!  Val has declined the idea of me mailing it to her LOL and I don't blame her, since hers is definitely better.

I need a nap first ...

30 January 2011

A challenge for Val

Tonight in chat, I offered Val a deal and a challenge: if she makes an underbust/waist corset I will post up pics of my first attempt at the McCall's 4861 view E.  Complete pics of the blue monstrosity.  And, before she left, I even upped the ante: not only will I post up pics but I will even mail it to her if she so chooses.

The why and how we came to this point aren't really relevant here ... Elaina witnessed the challenge both times, and I told Val I will post it publicly for the entire sewing blogosphere to read.  I will happily give her tips and advice on constructing it, offer all kinds of encouragement, plus she has my posts from last month to consult.  I have steered her towards either the McCalls 4861 E or the Laughing Moon #113 view B ... while I haven't made the LM yet I have heard good things about their corset patterns.

So here it is, folks.  Y'all are my witnesses ... and I suspect maggie will take a screenshot of this for the permanent record.  LOL  If y'all see Val in chat, be sure to cheer her on.  It's the only way I'll post full pics - "front, back, and inside" - of this truly terrible example of sloppy shoddy and just plain ugly sewing from me.

21 December 2010

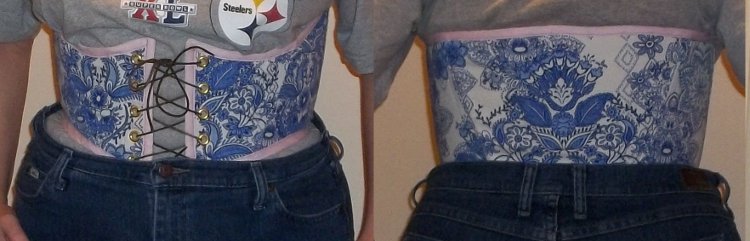
McCall's 4861 waist corset done!

It's not only finished, but photographed for proof!  Getting the eyelets through 4 layers of fabric (2 stiff canvas, 2 cotton duck) plus the buckram proved to be a PAIN, and as hard as I whacked the setting tool to set the eyelets ... I done broke my wooden cutting board I retired from food prep to crafting.  Oops.  Oh, yeah ... the pic:
My jeans are a bit loose around the waist after two and half days of only eating soup, so the spacing in front for the eyelets is a bit small.  I've been wearing it for almost an hour, and it is both sturdy and comfortable.  It will get the real test tomorrow on the supposedly 9 hour road trip.

I'm particularly happy with the back panel  :)  I now have a pretty backbrace.  Some of y'all know I have never taken a pic of the previous version, except for a cropped photo of the inside where I had stitched in a contrasting thread.  It's still too ugly to show y'all, but now I have a nice one to show off.

M4861 bound but not gagging

First up, my daily driver - the still unnamed Brother CS-770 computerized - does not tolerate hitting the poly boning with the same humor as ole Timex (the cheap 14-stitch mech).  I got the E6 error two or three times when I misjudged where the poly boning was, and one small thread knot on the bobbin side .. which thankfully was also on the lining side.

Hubby chose the binding, folks!  :)  Actually, I agreed with his choice.  I have navy blue binding, but the print's darkest blue is still obviously lighter than my navy blue binding ... so we went for the contrast to match the sides of the lining: light pink.
Now I need to clear off my table ... especially electronic and electrical devices ... to pull out my eyelet stuff, which includes a hammer.  I tend to whack my eyelets pretty hard and a couple times I've missed the little eyelet-setting thing-a-ma-jig and whacked my thumb, so yes I swing the hammer with a bit of force.  Ten goldtone eyelets, one black shoelace, and I will have my new backbrace!

M 4861 lining

I woke up a couple hours early this morning, sweating like I had just ruckmarched in August ... but the stuffiness headache is gone!  The head cold is still here in the form of major drainage, and I cannot go further than five feet away from a tissue, but I do feel better, and here's proof:
I cut out and sewed the lining for my waist corset/back brace this morning, and have already started to attach it and the outer layer to the canvas core.

I no longer have enough of the cotton duck print left to cut more pieces, but I did measure the uncut selvage: 22 inches of 44/45" wide duck has yield a layer and a half of this pattern.

I will say those bias seams (two per side!) really annoyed me this morning.  The extra stitching, tacking the seam allowances down about 1/16th to 1/8th from the seam itself, does help mitigate the bias effect a little but not enough to mollify me.  These bias seams put this pattern firmly into the "costume" realm -which McCall's does market it as - and not as a functional corset (without serious modification).  When I decide to do another underbust or waist corset, I will choose a different pattern.

20 December 2010

M4861 outer layer done

I've run out of energy for now, but I did get the outer fasion fabric layer cut and sewn, and picked out the lining, the leftover light pink linen/cotton (50/50) that remains after a summer blouse (which will go to my sister if I can remember to send it) and the skirt extensions on my medieval chemise when I ran out of the white-white.

I'm pretty pleased with how it looks, especially since I (successfully) tried to cut out the design centered on the back panel.  A note about the Hancock "special collection" cotton duck: it has a lot of bias stretch.  For some reason (wearing ease?) this pattern has two seams per side cut on the bias ... if I make it a third time I will need to fix that.  Meh, two will probably be enough from this pattern.

I'm not sure if I mentioned here or not, but for the most part I am disregarding McCall's instructions for this corset's construction, instead sort-of following this excellent tutorial by Sidney Eileen I found a couple weeks ago.  I'm also using her method of pressing the seam allowances to one side (alternating with the layers) and then stitching them down a bit to the side of the original seam.  My last two working brain cells say this should be stronger than pressing the seams open ... but this one should put it to the test.  I do have to make up for not using actual coutil!

If I can catch a second wind later this evening, I'll work on the lining ... but right now I am at the whiny stage of this head cold.  I'll spare y'all ... but hubby does get to hear it.

Needle notes on M 4861, cord, and poly boning

I have the canvas core sewn together, with the boning and cording on the inside, so not much to take a pic of ... but a few random thoughts as my 2nd round of decongestants kick in:

It's easy to sew through the hemp cord, and my machine doesn't complain about it either ... but boy does it dull a needle quickly.  So does sewing through stiff canvas and buckram ... 

While I proved with my first boned bodice last year that it is indeed possible to sew through poly boning, the machine will let you know as soon as the needle goes through the poly boning ... mine tend to complain about it, both "Timex" my original $80 Brother LX-3125 mech, and my daily driver $160 Brother CS-770 computerized (that I still haven't thought of a good name for yet).  For the record, I most certainly do NOT recommend sewing through poly boning ... nowadays I skip over the boning, which is why I sewed the core with a contrast thread, and will use fabric marker to mark the outer layers.  Oh, if you do sew through the poly boning, that will also dull your needle.  I don't think I'll admit how long it took me to figure that out last year.

Trimming the hemp cord and canvas makes an awful mess ... I've been trying to clean up after every couple of trims, but there is still little fibers and fray threads everywhere.  It's a good thing hubby also has a messy hobby - painting miniatures.

Finally, it makes for a slow slog when cutting and sewing to need to constantly stop and wipe a runny nose or sneeze.  *But* if I keep at it, I may have this done tonight!  Time to go scrap diving for the lining layer, and cut both that and the fashion fabric outer layer.

M4861 waist corset corded

Here it is ... the core layer poly boned and corded.  I'm using a stiff unbleached canvas as the core layer, poly boning from Hancock (half off sale) and hemp craft cord from Hobby Lobby to stabilize the poly boning which has a habit of molding to the body shape when worn (due to body heat).
Instead of sewing channels and running the cord through that way, I zigzagged the cord onto the base layer.  It's an experiment, plus I dreaded the thought of trying to pull uneven diameter cord through unevenly sewn channels like last time.  Sewing straight lines is definitely one of my weaknesses.

I ended up trying the boning scheme from the pattern.  Why not?  I'm playing around with all kinds of ideas I haven't tried on this one.  As I've mentioned, it takes little fabric and relatively little time to make.  The front has 4 cords next to the poly boning, and the back has 6 cords on each side.  The side bones have two on each side.  Oh - that's a strip of buckram under the boning at the center front where the eyelets will go.  Underneath the core layer is the outer fasion fabric layer: a nice cotton duck that softened up in the wash.  I only have a 1/4 yd of it on this piece, so I'll be able to see just how little fabric this pattern uses per layer.

18 December 2010

Waist corset M 4861 (E) in progress

I was going to put that my waist corset is now boned ... but I promise this is a family-friendly blog! (*snicker*)  I'll post up a pic after I cord it alongside the poly boning, as I am using unbleached canvas for the core and the boning tape it white, so it probably won't show very well until the tannish-brown hemp cord is alongside it.

I spent a bit of time earlier today googling images of medical-style back braces, and have to admit that was disappointing.  Most are for immobilization of either the lumbar region, the total spine, or up around the neck and shoulders.  The back of this corset covers the thoracic spine area, which is also where the most pain is for me (T4-T5, originally).  The ones for support showed vertical boning, which I already tried for the previous version and am not completely satisfied with. 

A couple showed a boning scheme similar to what the pattern instructions illustrate, which is making me reconsider my opinion of the boning scheme.  This particular one uses so little fabric and takes so little time, it's worth trying it.