
31 January 2011
Excessive pinning
My mystery home dec fabric has a velvet-like pile to it, which means it wants to wiggle and not feed evenly. Since I don't have a walking foot (although I am seriously thinking of getting one before the forecast ice hits tomorrow night) I am making do with excessive pinning ... cussing is optional.
 Yes, the long pleat pin is under the presser foot, by quite a bit ... but it is pinned about 1/4 inch from the edge, while the needle is in the left position and stitching at the 5/8 inch seam allowance. Once I get it this far, I stop, lift the presser foot, and reposition the fabric. Takes a while ... but it works.
30 January 2011
A challenge for Val
Tonight in chat, I offered Val a deal and a challenge: if she makes an underbust/waist corset I will post up pics of my first attempt at the McCall's 4861 view E. Complete pics of the blue monstrosity. And, before she left, I even upped the ante: not only will I post up pics but I will even mail it to her if she so chooses.
The why and how we came to this point aren't really relevant here ... Elaina witnessed the challenge both times, and I told Val I will post it publicly for the entire sewing blogosphere to read. I will happily give her tips and advice on constructing it, offer all kinds of encouragement, plus she has my posts from last month to consult. I have steered her towards either the McCalls 4861 E or the Laughing Moon #113 view B ... while I haven't made the LM yet I have heard good things about their corset patterns.
So here it is, folks. Y'all are my witnesses ... and I suspect maggie will take a screenshot of this for the permanent record. LOL If y'all see Val in chat, be sure to cheer her on. It's the only way I'll post full pics - "front, back, and inside" - of this truly terrible example of sloppy shoddy and just plain ugly sewing from me.
29 January 2011
V8626 outer layer cut out
After all these hours, I have finally gotten the outer layer for Vogue 8626 cut out, along with the facing/front of the lining which is supposed to be made of the outer fabric. When I started laying out the front pattern pieces, I was happy because I was certain I had enough to do the long version ... for the most part I did, except on that facing piece which is about 2 inches short. I'll be able to tell which pieces are the outer and which are the facing for sure: the facing had to be laid crossgrain and therefore the pinstripes are horizontal. I have enough scrap pieces to cut the missing 2 inches for the facing pieces and then use a joining stitch to attach them. Will this work? I'll find out ... probably tomorrow.
I've halted operations for tonight, because I somehow put my foot down wrong and my knee is now not feeling too happy about it. Meh, it happens. My knees are every bit as touchy as my back. Before that though ... I snapped a couple of pics to share.
 Here's the sleeve pattern piece for Margaret, who mentioned how she appreciates as many lengthen/shorten lines as pattern companies care to provide. I've read a few of her pattern reviews at PR where she mentions about four (?) standard alterations she does for dresses ... this is from memory so feel free to correct me, Margaret!
Now I mentioned taking out the center back deep pleat for the lining, and both Margaret and gloria mentioned I should measure to make sure this won't affect being able to move in the coat. So here's a pic of the lower back piece, with the deep CB pleat (plus a seam allowance) as well as the two side pleats below the shoulder blades:
 Plenty of room for movement. The deep CB pleat is part decoration and part swing/swoosh fanciness ... which seems to appeal to me in many different types of garments.
Overall, I've had a decently productive day ... there's ham and potato soup in the crock pot on top of the fabric accomplishments!
I've halted operations for tonight, because I somehow put my foot down wrong and my knee is now not feeling too happy about it. Meh, it happens. My knees are every bit as touchy as my back. Before that though ... I snapped a couple of pics to share.

Now I mentioned taking out the center back deep pleat for the lining, and both Margaret and gloria mentioned I should measure to make sure this won't affect being able to move in the coat. So here's a pic of the lower back piece, with the deep CB pleat (plus a seam allowance) as well as the two side pleats below the shoulder blades:

Overall, I've had a decently productive day ... there's ham and potato soup in the crock pot on top of the fabric accomplishments!
Thoughts ramblings and sewing levels
Finally cutting into the mystery home dec fabric for my V8626 mockup, and I've discovered it has a wiggly slightly stretchy quality to it I didn't notice over a year ago when I made a boned bodice out of some of it. This led to some random musing about not only how little I knew a year ago, but also how little I still know. My idea of handling this property of this still-don't-know-what-it-actually-is fabric? Glass and metal candle holders and more pins. I'm sure there is a trick I just don't know about, but I'm not inclined to wait around for someone to tell me. I'm in a mood to attack fabric with pins and blades and ain't stopping until it's time to thread up my machine!
While hunting up more long yellow-headed "pleat pins" that my mom told me she hates, another thought rambled through my caffeine-fueled mind: not only am I still unorganized, but I am still quite the stubborn little newb. My mom has decades of sewing experience, and advised me not to use these pins ... yet here I am digging through bags of stuff to find them.
This amused thought led to another, less amusing one: in the PR chat room, one gal says she used to think she was an intermediate sewist until she met me and maggie. For the record here - we both insist we are newbs. We just want to make things well beyond our respective skill levels and have no hesitation at the idea of diving right in and learning as we go. We're both quite crazy in this respect - and have spent several evenings discussing this. So please, unless you think you are as crazy as either of us, don't compare yourself to us!
Speaking only for myself now, I can say I now know what a welt pocket is ... which is a step better than last year. I now also know an invisible zipper is a separate item from a regular zipper, and the invisibility does not depend on how you put it in (compared to a regular zipper again). I haven't done either one. Nor have I made myself a nice jacket yet, much less one for hubby. Pants? Err ... nice loose swishy stuff, nothing fitted. While I did a mock fly, I still haven't gotten back to the Simp pattern with the real fly. Don't get me started on knits ... and the funniest thing is many swear knits are easy! I'll take fitting a corset over sewing a knit top any day ...
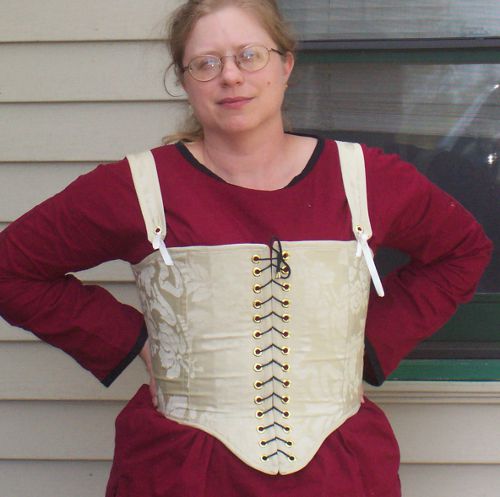
Which - as usual - brings me back to corsets. When I started making first the boned bodices, then my Elizabethan, I didn't really know corsets are supposed to be "advanced" and difficult. I just knew I needed an Elizabethan pair of bodies for my Renn Faire garb, and didn't know anyone to fit and make me one at the time. So, if I was going to have one to wear for Faire last spring, I had to figure out how to make it myself. I'm wearing it right now. Pics for those who haven't seen it:
 My Elizabethan isn't perfect. I still can't sew a straight line seam, and believe me that led to much cussing and frustration last year when I sewed the cording channels, then tried to pull uneven hemp cord doubled through unevenly sewn channels. This year I will be zigzagging the hemp cord to the canvas core ... but will be using large cable ties from the hardware store instead of poly boning ... so I'll still be sewing channels. I'll try to remember to use black thread to stitch them so y'all can see how badly I miss the fabric marker lines I need to draw to have any hope of some semblance of straight lines.

While hunting up more long yellow-headed "pleat pins" that my mom told me she hates, another thought rambled through my caffeine-fueled mind: not only am I still unorganized, but I am still quite the stubborn little newb. My mom has decades of sewing experience, and advised me not to use these pins ... yet here I am digging through bags of stuff to find them.
This amused thought led to another, less amusing one: in the PR chat room, one gal says she used to think she was an intermediate sewist until she met me and maggie. For the record here - we both insist we are newbs. We just want to make things well beyond our respective skill levels and have no hesitation at the idea of diving right in and learning as we go. We're both quite crazy in this respect - and have spent several evenings discussing this. So please, unless you think you are as crazy as either of us, don't compare yourself to us!
Speaking only for myself now, I can say I now know what a welt pocket is ... which is a step better than last year. I now also know an invisible zipper is a separate item from a regular zipper, and the invisibility does not depend on how you put it in (compared to a regular zipper again). I haven't done either one. Nor have I made myself a nice jacket yet, much less one for hubby. Pants? Err ... nice loose swishy stuff, nothing fitted. While I did a mock fly, I still haven't gotten back to the Simp pattern with the real fly. Don't get me started on knits ... and the funniest thing is many swear knits are easy! I'll take fitting a corset over sewing a knit top any day ...
Which - as usual - brings me back to corsets. When I started making first the boned bodices, then my Elizabethan, I didn't really know corsets are supposed to be "advanced" and difficult. I just knew I needed an Elizabethan pair of bodies for my Renn Faire garb, and didn't know anyone to fit and make me one at the time. So, if I was going to have one to wear for Faire last spring, I had to figure out how to make it myself. I'm wearing it right now. Pics for those who haven't seen it:

Not even a year has passed since I made my Elizabethan ... and already I want to make a better one. I've learned quite a bit from making it last spring, and even more while wearing it these past ten months. The biggest thing I've learned is ... it actually doesn't fit me quite right. It's close enough to not be uncomfortable, but it's a bit short through the torso, and the straps slide off my shoulder which means something aint' quite right there. As y'all can see from this back view, it gaps in a couple spots and overlaps at the very tops. With wear, it now gaps a bit in the front as well. Part of the problem is fitting (which I really didn't have a good grasp of the concept last year) and the other part of the problem is my fabric choice. Then again, reading through my review of the pattern from last year ... I had my hands full just getting a wearable garment! Oh, for those curious, this is from Simplicity 2621, which is a pretty decent pattern for being a Big 4 costume pattern, and does result in something wearable.
Don't y'all love when I come back after a day or so of quiet? I had another bleh day, then yesterday had both motivation and energy ... and did more housework! LOL I even reorganized my pantry after a massive cart-filling grocery trip, and got my son to organize his shelf of the pantry as well. Today is a big fabric-attacking day for me, since hubby and son escaped to a war gaming tournament for the day.
26 January 2011
Snow is coat-making motivation
I've had a couple days of no motivation, and a stubborn headache that wouldn't quit yesterday ... but this morning I woke to the kind of motivation I am truly tired of seeing:
 My poor little car. Looks like I'm not going anywhere today, because I am just not inclined to clear snow (and underneath it, ice) off my car just to start defrosting the door enough to open it ... and of course my son has yet another snow day.
As y'all know, I had already done a bit of stash diving and coat planning the other day, but hadn't made up my mind which one to start first. Both maggie and sewducky voted for Simplicity 2311, but after pulling it out and looking at the instructions ... I just ain't in the mood. One of the annoyances that set me off against this pattern was either it doesn't include a glossary of the sewing terms, or they are just too hard for me to find. It had pad stitching in bold, but no explanation of it that I could find. I consulted the Great All-Knowing Google about pad stitching, and found as the top result this interesting blog post answering the question: "What, exactly, is pad stitching?" Bookmarked for future reference, but (in theory) I shouldn't need to go to Google nor try to find my Readers Digest book of sewing just to even get a clue what a term the pattern instructions uses means.
So with the proverbial "wild hair" firmly in place, I pulled out Vogue 8626 and read the reviews for it. Along with positive reviews, the "very easy" designation, and the cup size already done in the pattern, I am sold. This pattern is just great for people needing the FBA ... SBAers can also rejoice because it actually does have separate pieces for A cup! Not simply throw in with B cup size like the two McCall's patterns I've previously looked at, but A cup has its own pieces. As I was ironing the pattern tissue, then locating the pieces for D cup and trimming them out, I noticed another huge plus for this pattern: not only are there finished measurements for bustline and waistline, but also hipline and even bicep on the sleeve! Multiple lengthen/shorten lines throughout also give me a warm fuzzy feeling for this pattern as well ...pretty much all the areas people need to adjust. I'll be able to cut an 18 to fit my shoulders, and the FBA is already done. Color me lazy and happy.
Looking over the pieces and instructions, about the only quibble I have is the lining is supposed to have the same pleats as the outer layer. Why? I think I'll layout the back piece so eliminate the deep CB pleat for the lining and place it on the fold line, which is clearly marked from the top of the piece to the bottom. The outer layer and lining are supposed to be hemmed separately so no worries about it matching on the bottom with this tweak.
For the mockup, I'll be doing the collarless short version ... mostly because I don't have enough of the purple pinstripe fabric to do the longer version with the stripes going vertically. I don't do horizontal stripes ... I think I am wide enough without calling attention to that.
24 January 2011
Lack of motivation
Today is a "blah" day. While lacing up my Elizabethan (this time without cats attempting to "help") it occurs to me I so need a new corset. Glancing at the local weather forecast, it occurs to me I so need a new coat and therefore need to get busy on the planned mockups. We have a week of daytime temps getting above the freezing point and nighttime staying above the mid-20s (Fahrenheit) and therefore the perfect time to get cracking on at least one of the mockups.
I also have two "UFOs" - UnFinished Objects. One is the denim slacks I have already cut out for Simplicity 2562 and the other is the doublet from Simplicity 4059 for my friend's Renn Faire garb (that I was supposed to have done for last spring's Faire!) where I have the fitting part done but haven't cut into the actual fabric that has been in my sewing area since ... late March of 2010.
So ... am I doing anything? Other than contemplating a third cup of coffee - and my coffee mugs are 14-16 ounces - not a thing. Of course, another mug of coffee requires I make another pot of coffee as hubby had his schedule shifted and helped me kill off this morning's pot.
There's gotta be some motivation here somewhere ...
23 January 2011
More silk/rayon brocades!
I hinted at this a few days ago after I ordered them but not received them yet ... but I simply could not resist when FabricMart put the remaining silk/rayon brocades on half off and bought the three I wanted but didn't buy before. By now, a few of y'all are tired of hearing about my red floral silk/rayon brocade, especially the one who denies it exists. LOL
Two sold out before I could copy the pictures off FM's website, so y'all will have to suffer with my poor photog (lack of) skills for these:
 The blue with Asian-style flying dragons ... it went fast once it was marked down.
 A lovely pearl white - with my usual problems trying to capture that color on pixels.
  FM calls this one "creamy gold" because they have/had another gold colored brocade with a different design, but compare my sorry pic of it to the professionally done one from FM's site:
 Trust me, I won't be quitting my day job for photography any time soon ... LOL
I can't help but wonder if maggie resisted the brocades yet again. I know she succumbed to the brown silk velvet I managed to resist ... greatly aided by it selling out before I caved in and ordered. We're doing a fabric trade and I did ask her for a small swatch of it just so I can feel what real silk velvet feels like. I'll need to ask her in chat if she has a brocade, or if she'd like a small swatch of it just to fondle ...
The true beauty of having multiple brocades in similar or complementing designs and colors is I can patchwork and colorblock the leftovers into a garment, assuring none of it goes to waste. Without a doubt, the red is still my favorite, and still "Myyyy precioussss ...". Just call me Gollem, with the red being the Brocade of Power! LOL
Two sold out before I could copy the pictures off FM's website, so y'all will have to suffer with my poor photog (lack of) skills for these:


I can't help but wonder if maggie resisted the brocades yet again. I know she succumbed to the brown silk velvet I managed to resist ... greatly aided by it selling out before I caved in and ordered. We're doing a fabric trade and I did ask her for a small swatch of it just so I can feel what real silk velvet feels like. I'll need to ask her in chat if she has a brocade, or if she'd like a small swatch of it just to fondle ...
The true beauty of having multiple brocades in similar or complementing designs and colors is I can patchwork and colorblock the leftovers into a garment, assuring none of it goes to waste. Without a doubt, the red is still my favorite, and still "Myyyy precioussss ...". Just call me Gollem, with the red being the Brocade of Power! LOL
22 January 2011
Stash diving and coat plans
Now that the flannel and fleece projects are done for time being, it's time for coats! Since coats can get fiddly, and because there's a stash contest going over at Pattern Review, I spent some time digging in my original plastic tub looking for mockup fabrics. All but a couple of the fabrics in this tub were bought in the first month or so of starting sewing ... and some are from when the first WalMart in our area closed down their fabric department ... so consider this your warning! LOL
I pulled out three fabrics I want to use, then matched up patterns to the fabrics. Funny, all three fabrics have a shade of purple in them. Must be my mood today. Are y'all prepared for this now? (After the pink faux fur, some of y'all are aware of my tackiness in fabric choices ...)
 This is a dark purple, with black and yellow pinstripes, and a drapey home dec "whatever". I used some of it over a year ago to make a boned bodice which I gave to a friend. The drapiness was the deciding factor for matching it with this Vogue pattern - I want the pleats in the back to hang properly.
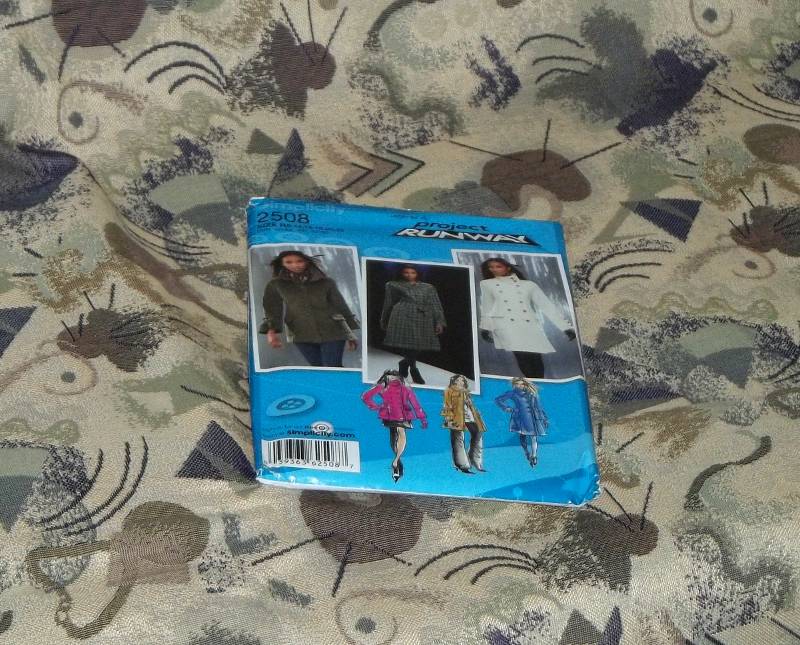
 This fabric design is just so wild, even if the colors are muted. It's a bit stiffer than the pinstripe one, so it should be good for either the lapels or the standup collar on this Simplicity pattern. Hubby likes the picture of the white coat on the envelope best, he says.
  I thought about using this fabric to make a slipcover for our couch, but it isn't big enough. I originally bought it to make a coat anyway LOL so this one should work well. It's sorta-kinda as still as the happy wild design one, but the fabric has a bit more given because of the loose weave.
So ... now which one to cut out and sew together first? And which fabric to line it in? Decisions ... decisions! Anyone have an opinion?
I pulled out three fabrics I want to use, then matched up patterns to the fabrics. Funny, all three fabrics have a shade of purple in them. Must be my mood today. Are y'all prepared for this now? (After the pink faux fur, some of y'all are aware of my tackiness in fabric choices ...)


So ... now which one to cut out and sew together first? And which fabric to line it in? Decisions ... decisions! Anyone have an opinion?
McCall's 4244 PJ pants done
I honestly meant to have these pajama pants done yesterday ... but my teenage son had a snow day (again!) and kept popping down to chat. No real complaints, as the chats were pleasant and interesting. I've been given the advice by a couple mothers with older children that if your teenager wants to talk, you should listen. So I did.
I have to admit sewing for a teenager presents some interesting challenges with regards to what constitutes fit and fashion. For some strange reason I had the silly notion this didn't apply to pajama pants that will NOT be worn outside the house. Silly me. I figured for the "waist"band to be worn at his high hip, but when he tried them on ... he was wearing them lower. He specifically asked for them to be long at the hem ... and this was while I thought he'd wear the elastic closer to his waist! He says he likes the length, but they are "too baggy" through the legs for his taste. For some reason I thought very loose-fit through the crotch and legs was desirable in pajama pants ... he says these feel "Aladdin-pants loose". Here's the pic so y'all can judge for yourselves (I made him pull the elastic up to the top of his hipbones for the pic!)
 To me, they look a bit long but otherwise comfortable. I guess the fact he went back upstairs and changed into his athletic shorts is my son's true vote of (no) confidence. Meh ... he was the only one who actually liked that flannel print, which I actually bought with hubby in mind. At least the waistband stays put - no safety pin needed for this pair.
I have to admit sewing for a teenager presents some interesting challenges with regards to what constitutes fit and fashion. For some strange reason I had the silly notion this didn't apply to pajama pants that will NOT be worn outside the house. Silly me. I figured for the "waist"band to be worn at his high hip, but when he tried them on ... he was wearing them lower. He specifically asked for them to be long at the hem ... and this was while I thought he'd wear the elastic closer to his waist! He says he likes the length, but they are "too baggy" through the legs for his taste. For some reason I thought very loose-fit through the crotch and legs was desirable in pajama pants ... he says these feel "Aladdin-pants loose". Here's the pic so y'all can judge for yourselves (I made him pull the elastic up to the top of his hipbones for the pic!)

21 January 2011
Cotton flannel pajama bottoms for son
Plaid cotton flannel again! This time I'm using a printed plaid, a Blizzard cotton flannel I bought on Black Friday sale for only $1.49/yd. I've used this Blizzard flannel before to make my mother-in-law pajamas, which she loved, and no problems with it after getting a heads-up that cotton flannel is a progressive shrinker. In fact, I liked that flannel enough to buy more of that specific print on the Black Friday sale (along with half a dozen others!).
Elastic waistband pajama bottoms are super easy to make, and are also the only thing son has asked me to make for him. McCall's 4244 men's pajama set has good reviews at PR, so I am not expecting any problems here ... once I determined the fabric was okay. As I pulled it out to iron it, I noticed the plaid wasn't lining up. After yesterday's experience with the twisted offgrain woven flannel, I put my nose down to the fabric to see if this one had done the same. Nope ... the print is offgrain, not the weave. Whew! So keep in mind the print is off on this fabric:
 For my son, this is a very colorful plaid. Seriously ... it has red in it! Son's taste in colors is similar to hubby's: greens and browns, and son throws rusts into the mix.
I had thought I may have an even plaid on my hands, but the ruler says not. The crossgrain stripes are 3-3/8 inches apart, while the ongrain stripes are 4 inches. It is unbalanced, as evident in the pic. So, an unbalanced uneven plaid to play with ... printed offgrain.
So, I've already gotten the front piece cut out ... all I have still to cut is the back and pockets for each side seam. The elastic length is already measured in the most scientific way possible: wrapping elastic around his waist and snugging it to what he calls comfortable, then taking it in another inch to account for the flannel's thickness and weight. I learned early on with suede pants that fabric weight and thickness affect how well the elastic will hold the pants up ... both my suede "pirate" pants have large safety pins helping the waistbands stay up!
I'm guessing my biggest challenge will be getting my son to model the finished project for a picture ...
Elastic waistband pajama bottoms are super easy to make, and are also the only thing son has asked me to make for him. McCall's 4244 men's pajama set has good reviews at PR, so I am not expecting any problems here ... once I determined the fabric was okay. As I pulled it out to iron it, I noticed the plaid wasn't lining up. After yesterday's experience with the twisted offgrain woven flannel, I put my nose down to the fabric to see if this one had done the same. Nope ... the print is offgrain, not the weave. Whew! So keep in mind the print is off on this fabric:

I had thought I may have an even plaid on my hands, but the ruler says not. The crossgrain stripes are 3-3/8 inches apart, while the ongrain stripes are 4 inches. It is unbalanced, as evident in the pic. So, an unbalanced uneven plaid to play with ... printed offgrain.
So, I've already gotten the front piece cut out ... all I have still to cut is the back and pockets for each side seam. The elastic length is already measured in the most scientific way possible: wrapping elastic around his waist and snugging it to what he calls comfortable, then taking it in another inch to account for the flannel's thickness and weight. I learned early on with suede pants that fabric weight and thickness affect how well the elastic will hold the pants up ... both my suede "pirate" pants have large safety pins helping the waistbands stay up!
I'm guessing my biggest challenge will be getting my son to model the finished project for a picture ...
20 January 2011
Hubby's solution to the offgrain flannel
First of all, apparently I am more disappointed about the flannel shirting than hubby is. He also came up with the solution of how to use it in a manner that won't be overly affected by the offgrain twist: fold it up into a scarf. In fact, he thought it would make a perfect "ridiculously long, wide, warm scarf" ...
 Here it is, along with the coat I made him, the hat I made him, and the gloves I made him. I just folded the fabric in half, then again in thirds, and sewed four rows of stitches longways to help it hold its shape. He said he needed to step outside quickly, as he was overheating in this warm gear inside.

Useless plaid cotton flannel - twisted and offgrain
Well, that just blew my long sleeve flannel shirt for hubby clean out of the water. It's a woven plaid, not printed, so when it refused to line up - even with pinning the selvages together and an attempt at coercive ironing and much harsh language in the process, I might add - I find myself back at the drawing board.
I asked on PR's message board about possible uses for this fabric, and have to admit a couple sound useful: the pet bed suggestion has merit here, but using it as bias tape ... I truly hate the colors! Hubby and I have two totally different ideas of what defines "colorful" clothing. I love pinks, purples and lavenders, and just about every variation of blue, while hubby likes subdued greens and browns, with an occasional navy blue thrown in but nothing too bright or strong or vibrant.
Just for trivial random rambling fun, the offgrain plaid is balanced but uneven, per my personal definitions of plaids. While the repeats have symmetry, parallel to the selvage is 3.5 inches while perpendicular to the selvage is 2.5 inches. I can't exactly use the terms "grainline" and "crossgrain" to describe this fabric. At least it won't be too expensive of a mistake: I bought it during a half-off sale on a day with an additional 10% total purchase.
Maybe I can use it to stuff my bumroll for Renn Faire ... or maybe if I make a pet bed of it the cats might lay on it instead of my fabric stash ... hey, it could happen. Now I'll have to go stash-diving for another warm fabric to make hubby's shirt ... it's going to be hard to break the news to him because he's really been looking forward to this shirt since he discovered the fabric 3 weeks ago.
McCall's 4518 Palmer/Pletsch "unisex" shirt for hubby
And yes, I used quote marks for "unisex" because once again, the fitting instructions for turning a flat-front men's shirt into a shaped front women's shirt is ... annoying. Once again, I cannot help but wonder WHY didn't they do two separate shirts? I don't think it's new news that (on average) mens' and women's torsos tend to be shaped differently. So why is a pattern maker trying to make one shirt pattern fit both?
At first, I thought maybe this was some Great Fitting Secret that no one has bothered to tell me ... then I got to actually using my last two working brain cells and recalled seeing women's shirt patterns without shaping. OK, so the transformation of a totally nonshaped shirt pattern to fit a woman's shape does has its usefulness.
That being said ... I am making this shirt for my husband, who is the epitome of The Ultimate Easy Fitting. I still am a bit puzzled why there isn't a sheet for just the construction steps ... instead there is 8 pages (!) of fitting plus construction plus more fitting. Please, Palmer/Pletsch/McCall's ... please make a simple "cheat sheet" of just the construction steps, with asterisks (*) for where to consult fitting notes or just put this in as an addition.
Oh yeah, the official start pic, with what hubby considers color:
 I bought this fabric on sale in November, and hubby found it in late December. I wasn't trying to hide it ... he just doesn't always notice new fabrics unless I show as I pull them out of the bag or box. The truly amusing part is, he actually asked if he could have this fabric for a shirt! LOL This plaid is way, WAY too bland for me ... not to mention I don't like wearing browns, so I wondered who he thought the fabric might be for if not for him. Gotta love him.
While I would love to participate in Peter's Mens Shirt Sew-Along, I am going to have to jump the gun on it. Hubby has been patiently waiting almost a month for this shirt. He really wants a nice warm flannel long sleeve shirt to wear around the house ... and I would like to get new fabric without hearing about "Now where will we put this?" So, I am starting this shirt today, as the evil white stuff starts to swirl through the air outside my windows ...
At first, I thought maybe this was some Great Fitting Secret that no one has bothered to tell me ... then I got to actually using my last two working brain cells and recalled seeing women's shirt patterns without shaping. OK, so the transformation of a totally nonshaped shirt pattern to fit a woman's shape does has its usefulness.
That being said ... I am making this shirt for my husband, who is the epitome of The Ultimate Easy Fitting. I still am a bit puzzled why there isn't a sheet for just the construction steps ... instead there is 8 pages (!) of fitting plus construction plus more fitting. Please, Palmer/Pletsch/McCall's ... please make a simple "cheat sheet" of just the construction steps, with asterisks (*) for where to consult fitting notes or just put this in as an addition.
Oh yeah, the official start pic, with what hubby considers color:

While I would love to participate in Peter's Mens Shirt Sew-Along, I am going to have to jump the gun on it. Hubby has been patiently waiting almost a month for this shirt. He really wants a nice warm flannel long sleeve shirt to wear around the house ... and I would like to get new fabric without hearing about "Now where will we put this?" So, I am starting this shirt today, as the evil white stuff starts to swirl through the air outside my windows ...
19 January 2011
Revelling in fabric
I've made some recent fabric acquisitions, along with a couple fabric splurges ... aided and abetted by sales, of course. This afternoon, I decided to pull out my fabrics and take photos - always a good excuse to fondle the fabric! Here we go:
 From left to right: charcoal grey wool coating, lavender silk dupioni, emerald silk/rayon satin, a cotton that has the texture of linen, and a soft cotton flannel. Not pictured is the 15 yards of unbleached cotton muslin I scored for only 59 cents per yard. Now, for the splurges:
 This one I paid regular price for ... a red silk jacquard. It's a bit difficult to photograph properly, but I think y'all can get the idea from this. Another splurge (on sale even!)
 Silk charmeuse, that has been on my "wishlist" at FM for well over a month ... and it finally went half off! I adore the wild large print and the colors. I need to find the "perfect" pattern for a long tunic to show it off.
Now, I have some mystery bundle fabrics ... and I am still on the fence about getting these or not. First, the fabrics I think I can do something with:
 I just discovered this afternoon the teal on the far left is silk ... a ravel thread was stuck to the glitter stretch velvet, and I tried to snap it. No dice. That's when I finally saw the small piece of tape in the corner: "2-silk". The burn test confirmed this. I'll certainly think of something for it ... now for fabrics where I am scratching my head - or working on a trade:
 Knit - knit - stretch woven. There's also a white knit and a brown stretch woven that didn't want to photograph right. The salmon/coral on the right is not accurately depicted, and neither is the light taupe-ish knit on the left. Heck, for that matter the dots on the knit in the middle are a very pale peachish. Oh well ...
And oh joy ... the other silk/rayon brocades went half off yesterday! I have no willpower when it comes to these ... had to get 3 more to complement my lovely red floral splurge. Hopefully, that box will arrive by Saturday.


Now, I have some mystery bundle fabrics ... and I am still on the fence about getting these or not. First, the fabrics I think I can do something with:


And oh joy ... the other silk/rayon brocades went half off yesterday! I have no willpower when it comes to these ... had to get 3 more to complement my lovely red floral splurge. Hopefully, that box will arrive by Saturday.
18 January 2011
Happy hubby
He had a much bigger grin on his face when I brought him this hat, and again when he tried it (and promptly ran to see himself in the mirro). I had to get him to quit making silly faces for the camera ... but this is what a happy hubby looks like after all day in the cold rain with only a thin army-issue fleece hat:
 After feeding him, I held up the back yoke to the McCall Palmer/Pletsch pattern I'm going to use for his flannel shirt, so he has another reason to grin: pattern prep has started!

Easy fleece cap McCall 4681 E
With less than 2 hours work - including tracing off and hand sewing, I think I truly like this easy fleece cap I just made for hubby. As I've mentioned before, hubby is from Florida and doesn't like cold weather anyway. Add to that, he is also active duty military ... and is required to keep the "bad army haircut" as long as he is still in, so no hope of natural insulation from his hair. Over the weekend while I was working on my faux sherpa beret and fingerless gloves, he asked for a simple fleece hat to keep his head warm ... and was NOT an army-issue color.
As soon as he saw the photos and line drawings for McCall 4681 he wanted on (minus embellishments, of course!). Each view for M4681 has a slightly different pattern piece and instructions, so I read over the instructions for each and chose view E as the not only the simplest, but the one that made the most sense to me for construction.
I had to measure his head last night, since McCall didn't use hat size but inch measurements for their sizing. Hubby needed a medium according to the measurement chart. Regardless of which size I needed, I had to trace it off due to the way the pieces overlap on the different sizes:
 I suppose there is a remote chance my son may want one, once he sees hubby's. Remote - the kid prefers store-bought stuff. He's learned not to say "stuff with a label" because I mentioned wanting to buy my own labels to put in the clothes I make.
Now, I don't know about y'all, but I have yet to successfully mark fleece with a fabric marker. Instead, I mark important things - like leaving an opening to turn a fleece hat - with my long yellow top pins:
 Another thing the pattern instructions mention doing that I still have not accomplished: pressing seams and whatnot in fleece! I don't know if it's just me, or if the fleece takes advantage of my inexperience like a naughty and mischievious child ... but I have yet to successfully press fleece and honestly have given up trying several projects ago. If there is a secret to it, no one has told me.
A few seams, turn, then hand stitch the opening closed and tack the two layers together ... and here it is:
 Since hubby and I wear the same size army soft cap (6-7/8) I tried it on to make sure there was enough stretch ... success! The cap itself is double layer, and when turned up that is four layers of fleece over the ears. That should be more than enough to keep even hubby's ears warm. He'll want it later in the week if the forecast cold front moves through.
Next project will finally be hubby's flannel shirt. If it sounds like hubby is getting the lion's share of recent projects ... a happy hubby doesn't complain as much about recent fabric purchases, although he still does make a few noises about how much space the growing stash of fabric takes. If my box arrives today as it should, I'll post about recent acquisitions - and a splurge.
As soon as he saw the photos and line drawings for McCall 4681 he wanted on (minus embellishments, of course!). Each view for M4681 has a slightly different pattern piece and instructions, so I read over the instructions for each and chose view E as the not only the simplest, but the one that made the most sense to me for construction.
I had to measure his head last night, since McCall didn't use hat size but inch measurements for their sizing. Hubby needed a medium according to the measurement chart. Regardless of which size I needed, I had to trace it off due to the way the pieces overlap on the different sizes:

Now, I don't know about y'all, but I have yet to successfully mark fleece with a fabric marker. Instead, I mark important things - like leaving an opening to turn a fleece hat - with my long yellow top pins:

A few seams, turn, then hand stitch the opening closed and tack the two layers together ... and here it is:

Next project will finally be hubby's flannel shirt. If it sounds like hubby is getting the lion's share of recent projects ... a happy hubby doesn't complain as much about recent fabric purchases, although he still does make a few noises about how much space the growing stash of fabric takes. If my box arrives today as it should, I'll post about recent acquisitions - and a splurge.
17 January 2011
Second beret and fingerless gloves done
OK, now I think I can put McCall 5996 away ... just finished up hubby's solid brown pair. As I mentioned in my earlier post today, this is honestly not a complicated pattern. Four pattern pieces, only a few steps to put it together - and here we are:
 That's the second beret I did up yesterday but didn't snap a pic. I decided to put the seam on the inside this time. And those are hubby's gloves, one face-down and the other holding my NON-heatset fabric marker.
I forgot to mention this morning a recent addition to my bookmarks folder: Adonising's tips for fleece. The right side/wrong side tip was definitely used this morning while laying the fleece out to cut!
For those of y'all who might like the fingerless glove idea without the mitten-style finger covers, here's the in-progress pic pausing at this step:
 There's a pair of stitch lines at the wrist area on the bottom front piece - I like this little feature. Just run a set of gathering stitches, and barely gather them to keep the inside wrist portion from stretching too much. It's part of the pattern ... I can't take credit for it.
I'm still putting the seams on the outside for these gloves. Hubby asked about it ... I personally find this more comfortable as opposed to the seams being against the skin. Is this just another peculiarity of mine? Or do others feel the same? Hubby thinks it a little odd-looking, but too late now because I was snapping this pic when he mentioned it. What do y'all think about this seams-on-the-outside idea?

I forgot to mention this morning a recent addition to my bookmarks folder: Adonising's tips for fleece. The right side/wrong side tip was definitely used this morning while laying the fleece out to cut!
For those of y'all who might like the fingerless glove idea without the mitten-style finger covers, here's the in-progress pic pausing at this step:

I'm still putting the seams on the outside for these gloves. Hubby asked about it ... I personally find this more comfortable as opposed to the seams being against the skin. Is this just another peculiarity of mine? Or do others feel the same? Hubby thinks it a little odd-looking, but too late now because I was snapping this pic when he mentioned it. What do y'all think about this seams-on-the-outside idea?
Fingerless gloves for hubby
I'm still playing with McCall's 5996 view E - the fingerless gloves with mitten covers for the fingers ... this time for hubby in solid brown fleece. The brown fleece does quite match the brown canvas coat, but he doesn't see enough of a difference to change his opinion/preference. Apparently a few think this is a complicated pattern - it isn't! In fact it is surprisingly simple. Start off with four pattern pieces:
 The finger cover on the far right is repeated for a total of four of that piece, but other than that ... that's all. Did I mention how nicely the red dot stuff sticks to fleece by static electricity? All I do is add a pattern weight in the middle - and recently discovered votive candle holders make excellent pattern weights once they are dusted off! I have quite a few glass and metal votive holders ...
While cutting out the first piece, I also discovered my Olfa rotary blade is still very sharp! I barely nicked my finger between the last joint (most distal) and the nailbed, and immediately started bleeding like a stuck pig. It's a technical medical term ... yeesh, but a simple small clean cut will bleed more than an abrasion (like barking a knuckle trying to unstick a bolt). So, I decided to blog while waiting for the blood to quit oozing after running it under cold water to encourage capillary shrinkage.
Not the recommended way to start off the day's sewing.
16 January 2011
Pink faux fur revisited
No, I haven't pulled out the faux furs that shed even more than my cats, but the pink faux fur is still a bit of a running joke in the chat room. Folks who missed the pic the first time around tend to disbelieve it exists ... those who saw it say they still can't believe I would buy such a monstrosity. Especially the small but vocal "Anti-Pink Brigade".
The whole pink fur idea goes back the the Tacky 80s, when I was a kid and begged my mother to buy me a dyed hot pink rabbit fur coat one year. Mom not only told me I was dreaming, but that the only way I'd get one is if I buy my own when I grew up. If I could find on in good condition, I would ... but until then this pink-mauve faux fur will have to do and it is destined to become the vest in M 5983, another which just recently went out-of-print.
So, for those who missed it, here once again is photographic proof that my tackiness knows no bounds:
 Now, to my surprise, maggie says she not only likes it but would like some for herself (just at a lower price point than what I paid, which was half off!). And yes, "Fabric Ripper" is another chat joke ... one frustrating night someone asked what "dfr" stood for and I quipped that at the time it meant "Diningroom Fabric Ripper". The nickname stuck - particularly on evenings where I mention doing a lot of seam ripping.
Of course maggie has no call to be the least bit jealous of my fabric acquisitions, especially after this latest round of bragging about what nice fabric she scored from a Fabric Mart mystery bundle. I said a few words that I wouldn't type here or in her comment zone ... mostly about the silk suiting, which stung even more since they sold out of the herringbone wool suiting they ran for only $5/yd last month.
So ... am I bringing all this up to avoid admitting to not accomplishing much today? Meh, I suppose it depends. I did cut out and sew another faux sherpa beret from M 5996, this time in medium ... and gave the large to my partner-in-crime for Renn Faire since he not only wears a larger hat size than I do, but also collects hats like some women collect shoes. I also cut out another left handed fingerless glove, but haven't sewn it just yet. It's a good thing only one glove needed to be redone, because there isn't enough left of the scraps now. A smidge over a dollar's worth of uber-sale sherpa (26 inches and I think it was 60 inches wide) and I have two berets and three fingerless gloves.
My mom called while I was sewing the band on the beret, and when I mentioned the fingerless gloves she said that was something I can make her (and she doesn't need to give me her measurements still!). I've asked if she just wanted the pattern, so she can make multiple pairs. Yup, so at some point soon I'll trace off another copy of the gloves, or just send her the tissue copy since I have it traced off on the red dot stuff already. Oh - the red dot stuff sticks to fleece and sherpa nicely. I guess there actually IS a good use for static electricity.
The whole pink fur idea goes back the the Tacky 80s, when I was a kid and begged my mother to buy me a dyed hot pink rabbit fur coat one year. Mom not only told me I was dreaming, but that the only way I'd get one is if I buy my own when I grew up. If I could find on in good condition, I would ... but until then this pink-mauve faux fur will have to do and it is destined to become the vest in M 5983, another which just recently went out-of-print.
So, for those who missed it, here once again is photographic proof that my tackiness knows no bounds:
Of course maggie has no call to be the least bit jealous of my fabric acquisitions, especially after this latest round of bragging about what nice fabric she scored from a Fabric Mart mystery bundle. I said a few words that I wouldn't type here or in her comment zone ... mostly about the silk suiting, which stung even more since they sold out of the herringbone wool suiting they ran for only $5/yd last month.
So ... am I bringing all this up to avoid admitting to not accomplishing much today? Meh, I suppose it depends. I did cut out and sew another faux sherpa beret from M 5996, this time in medium ... and gave the large to my partner-in-crime for Renn Faire since he not only wears a larger hat size than I do, but also collects hats like some women collect shoes. I also cut out another left handed fingerless glove, but haven't sewn it just yet. It's a good thing only one glove needed to be redone, because there isn't enough left of the scraps now. A smidge over a dollar's worth of uber-sale sherpa (26 inches and I think it was 60 inches wide) and I have two berets and three fingerless gloves.
My mom called while I was sewing the band on the beret, and when I mentioned the fingerless gloves she said that was something I can make her (and she doesn't need to give me her measurements still!). I've asked if she just wanted the pattern, so she can make multiple pairs. Yup, so at some point soon I'll trace off another copy of the gloves, or just send her the tissue copy since I have it traced off on the red dot stuff already. Oh - the red dot stuff sticks to fleece and sherpa nicely. I guess there actually IS a good use for static electricity.
15 January 2011
M5996 sherpa fingerless gloves/mittens done
Fabric purchased 21 hours ago ... now the second planned project is finished. Of course, I also have a little under half the faux sherpa fabric left over ... that was NOT planned. Here's both projects together (proof, if you will):
 Now for the spotlight on the fingerless gloves. First, the fingerless idea:
 A hand model I am not. LOL This was the first one done, and the finger cover turned out a bit big because the pattern allows for fixing a lining in there where I skipped it due to my fabric choice. On my second one, I trimmed off about 1/4 inch from the bottom of the finger cover and increased my seam allowance around it, which turned out better but now my gloves are lopsided. I could remake the left hand one if it bugs me too much. Now for the covered finger/mitten look:
 They may be a poor color for me, and definitely not "expertly" made since this is my first time playing with faux sherpa, much less double-sided faux sherpa, but they certainly will be warm and useful!
Now ... I am debating remaking the hat in a medium instead of a large, and redoing the left glove ... and lunch. It's 2 in the afternoon and I just realized I cut and sewed through normal lunch time.


Now ... I am debating remaking the hat in a medium instead of a large, and redoing the left glove ... and lunch. It's 2 in the afternoon and I just realized I cut and sewed through normal lunch time.
Sherpa bought and sewed this quick
So I headed out to Hancock yesterday afternoon, waiting for the warmest time of the day to leave because not only do I despise cold weather but this cold snap is lasting too long this time. My goal was to grab about 3 patterns on sale and snag as much of the on-sale cotton muslin as I could ... last time they ran a good sale on muslin the quilters bought it up in less than 24 hours after I got my 10 yards. I know because I tried to go back for more!
This time, I bought 15 yds of 45" wide unbleached muslin ... for $0.59/yd. That should do me for a year ... Renn Faire is coming, and I have things to line and undergarments to make! Hopefully this year I'll get outer garments made so I am not walking around the Realm in my underwear LOL
Now, I mention sherpa in the post title ... on the uber-sale table in the back near the muslin aisle, I discovered a double-sided sherpa piece. Not much left of it ... it measured only 26", but at $1.50/yd I could so live with tan. The sun had set and the temperature was dropping like a rock as I left Hancock. My plan: warm hat and gloves!
This plan was accomplished quite quickly: I think I spent more time hunting up all the pattern pieces on McCall's 5996 than I did sewing (not counting time to stop and wind a new bobbin). This is the beret after a run through the washer and dryer .... did I mention this fabric is quite stretchy?
 I'm not exactly a fashion model in the morning ... and I may actually need a medium instead of the large I made ... but it covers the tops of my ears and will keep my head warm. For S&Gs - err, the fun of it - I sewed the seam on the outside instead of the usual right sides together, and also sewed the band in "wrong" side out ... although I'm not sure this fabric has a real "wrong" side.
It took maybe 10 minutes to actually cut out, and roughly half an hour to sew once I figured the best way to cuss ... err, persuade the fabric to stick to itself and go under the presser foot the way I wanted it to do. Definitely lengthen your stitches if you use this stuff! It's really fluffy.
After seeing the pattern picture for the fingerless gloves/mittens combo in this same pattern, hubby wants one also. He's reminded me I mentioned a fleece cap for him, so I showed him M 4681 that I bought for that purpose. Of course, he likes the more complex fingerless gloves from that pattern more ... He also prefers a solid colored fleece, instead of the remnants of his plaid fleece from his coat. I boxed up the solid fleeces and put them in my closet already because I had planned to use up the remainder of the plaids ... so much for that.
We'll see how motivated I get today and tomorrow.
This time, I bought 15 yds of 45" wide unbleached muslin ... for $0.59/yd. That should do me for a year ... Renn Faire is coming, and I have things to line and undergarments to make! Hopefully this year I'll get outer garments made so I am not walking around the Realm in my underwear LOL
Now, I mention sherpa in the post title ... on the uber-sale table in the back near the muslin aisle, I discovered a double-sided sherpa piece. Not much left of it ... it measured only 26", but at $1.50/yd I could so live with tan. The sun had set and the temperature was dropping like a rock as I left Hancock. My plan: warm hat and gloves!
This plan was accomplished quite quickly: I think I spent more time hunting up all the pattern pieces on McCall's 5996 than I did sewing (not counting time to stop and wind a new bobbin). This is the beret after a run through the washer and dryer .... did I mention this fabric is quite stretchy?

It took maybe 10 minutes to actually cut out, and roughly half an hour to sew once I figured the best way to cuss ... err, persuade the fabric to stick to itself and go under the presser foot the way I wanted it to do. Definitely lengthen your stitches if you use this stuff! It's really fluffy.
After seeing the pattern picture for the fingerless gloves/mittens combo in this same pattern, hubby wants one also. He's reminded me I mentioned a fleece cap for him, so I showed him M 4681 that I bought for that purpose. Of course, he likes the more complex fingerless gloves from that pattern more ... He also prefers a solid colored fleece, instead of the remnants of his plaid fleece from his coat. I boxed up the solid fleeces and put them in my closet already because I had planned to use up the remainder of the plaids ... so much for that.
We'll see how motivated I get today and tomorrow.
13 January 2011
S2566 blouse in black
And here it is, the second blouse from the Simplicity 2566 pattern, done up in printed cheap cotton I've had for about a year:
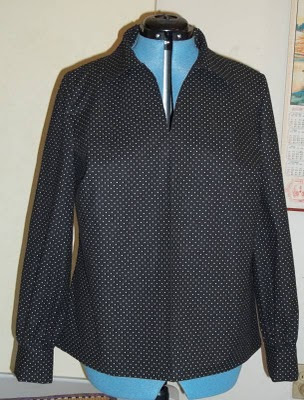 Not only does it fit Mathilda better ... it definitely fits me better! It's casual; it's cute; it's whimsical ... and boy did it turn out looking so totally 80s! It also needs a wash and press, which it will get once I have tonight's ensemble dryer-fluffed. My challenge for the next 5 hours: keeping my two lighter colored cats from shedding on the outfit! Both hubby and I will be wearing black pants, which the fur monsters find irresistible ...
Now that I've worked out the side dart FBA idea, and gotten a casual blouse as a result ... onward to hubby's cotton flannel plaid long sleeved shirt. I'm going to give McCall's 4518 for it, a casual camp shirt style with a facing instead of the collar band/stand. I used the other Palmer/Pletch unisex shirt to make hubby's parrot shirt, and he mentioned he doesn't care for the dropped shoulder on it, so I'll try this one and see how he likes it (beyond the cotton flannel aspect).

Now that I've worked out the side dart FBA idea, and gotten a casual blouse as a result ... onward to hubby's cotton flannel plaid long sleeved shirt. I'm going to give McCall's 4518 for it, a casual camp shirt style with a facing instead of the collar band/stand. I used the other Palmer/Pletch unisex shirt to make hubby's parrot shirt, and he mentioned he doesn't care for the dropped shoulder on it, so I'll try this one and see how he likes it (beyond the cotton flannel aspect).
12 January 2011
S2566 blouse FBA WIN!
I know I mentioned a plaid shirt for hubby ... but I got the proverbial "wild hair" last night and went back to the side dart FBA on the Simplicity 2566 blouse. This time I am using a cute $1/yd cotton print, black with little white dots. The FBA failure has been bugging me, especially with the vest now finished.
Between my last two working brain cells, and discussions with sewists who know more about darts than I do, I decided to leave the dart legs as they were and start pulling the dart point towards the inside by an inch. The dart started to look more normal:
 It might look more normal, but it is still outside the strike zone on me - still low and outside, though not nearly as bad. So this morning, I unpicked the dart and brought the dart points inside by another half inch:
 This time, it was just right! Now that I've discovered "right" via ye olde tryal and err method (Shakespearean spelling for effect) I will trace off the blouse front piece to the red dot stuff ... and while I'm at it, measure the width versus length, because I suspect there is a ratio at play here. If I can nail down an actual ratio, then future side dart FBAs should be less trial-and-error and a little more methodical. Plus, I am still a geek at heart ...
Some of y'all might notice the original darts ... they don't change shape at all. Margaret over at PR pointed that out to me ... guess that is something to keep in mind when messing with darts in general. Perhaps the pattern grading software thinks boobs get smaller as the body gets bigger? HA!
Now, to top of the "I win!" feeling this morning - I finally got a good pic of the buttons on my vest! These beautiful shiny buggers are a royal PITA to photo ... but after several deleted attempts:
 I'm of the opinion these buttons elevate the vest and blouse from "really nice" to "AWESOME!" ... FBA mistake on the blouse notwithstanding.
Now to cut out the back, collar, and sleeves in the black and white dotted cotton for a cute whimsical blouse ... just for the fun of it.
Between my last two working brain cells, and discussions with sewists who know more about darts than I do, I decided to leave the dart legs as they were and start pulling the dart point towards the inside by an inch. The dart started to look more normal:


Some of y'all might notice the original darts ... they don't change shape at all. Margaret over at PR pointed that out to me ... guess that is something to keep in mind when messing with darts in general. Perhaps the pattern grading software thinks boobs get smaller as the body gets bigger? HA!
Now, to top of the "I win!" feeling this morning - I finally got a good pic of the buttons on my vest! These beautiful shiny buggers are a royal PITA to photo ... but after several deleted attempts:

Now to cut out the back, collar, and sleeves in the black and white dotted cotton for a cute whimsical blouse ... just for the fun of it.
11 January 2011
S2566 blouse and vest
The buttons are on and the vest is finished! I managed to persuade my teenage son to take pics, and he insisted I try everything on for Thursday evening. Since I only have a little over 48 hours until the banquet, I won't get black slacks done up, so I will be wearing brand new black jeans with the blouse and vest ... but I am quite pleased with how this turned out overall. Especially my first attempt at plaid matching. First, the back view:
 Hmm, little bit of pooling in the small of my back ... looks like I might need to learn the swayback adjustment next ... after I nail down the FBA idea, of course. Now, about that FBA:
 It buttons over my boobs without gapping or pulling! That alone is a victory for me. I'll need to refine my shaping skills, as I have a bit of gapping at the armhole ... but it's also possible I unintentionally pulled the fabric. Guess who skipped the staystitching again?
I have plenty of room in the waist, even without curving my seams outward on the sides seams. Since I had to wait for my son to finish his breakfast, I've been wearing it for a good 20 minutes and moved around and even tied back my hair while waiting, so I know for sure I have freedom of movement in this.
Overall, I like this pattern. Once I get the blouse's side dart FBA just right, I'll trace this one off onto the red dot stuff so I can use it more. I probably won't need too many vests like this, but a summer one could come in handy for son's end of year awards functions.
Next up in the "to sew" list: cotton flannel long sleeved shirt for hubby ... in plaid. LOL
Vest finishing touches
Last night I sewed the lining to the wool, trimmed the seam allowances, and turned it ... but didn't snap a pic because I hadn't pressed it. Now the vest is pressed after hanging on Mathilda my dressform all night, and I sewed the side seams together. I was in a groove and didn't feel like taking a pic break, so ... on to the buttonholes!
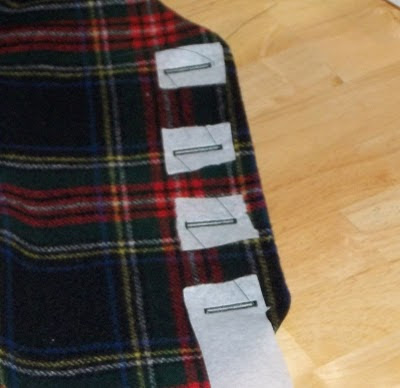 My camera's auto-focus picked a different spot than the buttonholes to focus on, but you can see them decently ... and yes, I broke out my embroidery tear-away stabilizer to sew them in, even though the back of the lining is interfaced. I didn't want to take a chance on my wool stretching any, but at the same time I decided against putting interfacing on the back of the wool.
I went with horizontal buttonholes, as this is a rather close-fitting vest and I don't want any distortion to show if it's one of my water-retaining days when I wear it. All that's left is handsewing the shank buttons on ... the 7/8 inch version of the buttons I used for the blouse's cuff. Hopefully the larger version will photo better than the tiny ones did.

I went with horizontal buttonholes, as this is a rather close-fitting vest and I don't want any distortion to show if it's one of my water-retaining days when I wear it. All that's left is handsewing the shank buttons on ... the 7/8 inch version of the buttons I used for the blouse's cuff. Hopefully the larger version will photo better than the tiny ones did.
10 January 2011
It looks like a plaid vest now
Today I laid out the pieces, cut them out, and after a nap put the various plaid wool pieces together into something that now strongly resembles a vest:
 Looks like I got lucky in the front with the vertical "mirror" image even plaid matching up! The princess seams won't as impressive, as the wool shifted slightly while sewing ... plus there's that whole curve idea ... which I also did on the waist.
Now comes the fun part: pinning the lining to the plaid wool along all but the side seams. This may take a while, but I did break out extra pins for the occasion.

Now comes the fun part: pinning the lining to the plaid wool along all but the side seams. This may take a while, but I did break out extra pins for the occasion.
Plaid matching ... sorta
I'm a bit slow to get moving this morning. Maybe I need more coffee, or maybe it's because I sound like a bowl of Rice Crispies trying to move around. My son celebrated his snow day off school by sleeping in ... and since he's finally up and moving I guess I should make an attempt at moving around myself.
I had to wait my turn for the dryer yesterday, and while I did get the wool run through the dryer with a hot wet towel ... I didn't layout the pattern pieces are do any cutting. However I have started that this morning:
 Maybe I'm just not feeling too adventurous this morning. Or maybe my cheap gene is telling me the $1/yd cotton print plaid would be better to do full plaid-matching than this lovely $8/yd wool ... but I am only matching horizontally, using a very convenient shorten/lengthen line on the pattern that is consistent on all pieces just 1 inch above the waistline (which is only marked on the front piece anyway). I've lined all the pieces up so that one white yarn is centered between the s/l lines on the pattern ... which also required a bit of gentle tugging on the fabric to get it as straight as I am going to accomplish this morning. I even drew a blue arrow at the top of the pic to point out the lines and white yarn, but the tip of the arrow is a bit off.
I've read that plaid matching is best accomplished by cutting out single thickness, but my Thursday evening deadline is roaring up on me fast. I have plenty of cheaper plaids to work out the details ... if I'm honest about it, I simply have plenty of plaids. I do love plaids, so at some point in the near future I will get a better handle on matching these plaids both ways.
Caffeine, nicotine, and sugar are my usual methods of motivation in the morning ... and today breakfast was a piece of my birthday cake from last night, so it's definitely "one of those mornings". If you have useful tips on plaid matching, feel free to leave them here ... and I'll refer back to them when I am in a more cheerful mood.
Another tip from my "Thank you, Sgt Obvious" file: spellcheck function catches typos. Who'd've thunk it?
I had to wait my turn for the dryer yesterday, and while I did get the wool run through the dryer with a hot wet towel ... I didn't layout the pattern pieces are do any cutting. However I have started that this morning:

I've read that plaid matching is best accomplished by cutting out single thickness, but my Thursday evening deadline is roaring up on me fast. I have plenty of cheaper plaids to work out the details ... if I'm honest about it, I simply have plenty of plaids. I do love plaids, so at some point in the near future I will get a better handle on matching these plaids both ways.
Caffeine, nicotine, and sugar are my usual methods of motivation in the morning ... and today breakfast was a piece of my birthday cake from last night, so it's definitely "one of those mornings". If you have useful tips on plaid matching, feel free to leave them here ... and I'll refer back to them when I am in a more cheerful mood.
Another tip from my "Thank you, Sgt Obvious" file: spellcheck function catches typos. Who'd've thunk it?
09 January 2011
S2566 vest lining done
I just sewed up the vest lining, and tried it on with hubby's assistance to hold the side seams together ... and it looks like I not only got the princess seam FBA right, but my "curve the seams out on the princess seams" strategy to bring the waist out from fitting a 32" to fitting my 35" waist worked! I've done my little happy dance, and dressed up Mathilda for a pic:
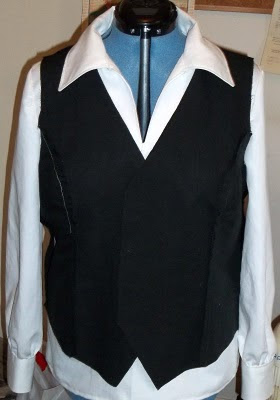 Check it out ... Mathilda is stylin' now! Just a note, I didn't baste the side seams together since I had two extra hands when trying it on, so the sides are open in this pic. Since black just will not photo properly, here is a different version of this same pic, run through GIMP and with adjusted levels:
 Now you can see the seams, and where I didn't quite ease the curve right on the bust LOL. For those with GIMP, look under "Colors" then select "Levels" and compress the input range to the left by quite a bit to get the same effect.
Time for me to take a deep breath, toss my Stewart plaid wool in the dryer with a warm damp towel ... then cut out the vest in it! It's both exciting and scary.


Time for me to take a deep breath, toss my Stewart plaid wool in the dryer with a warm damp towel ... then cut out the vest in it! It's both exciting and scary.
08 January 2011
Plaid wool vest with FBA started
Coffee ... this is definitely a "need coffee" morning, with evil white stuff on the ground when I woke up this morning. I discovered I left my iron on overnight (eek!) so the braindeadness must have started last night.
I did snap an official "start" pic for the vest last night, and played with settings in GIMP until the plaid looked like it does in real life. A dark plaid is so difficult to photograph properly!
 The background of the plaid is black, with yarns of white, yellow, blue, green, and red woven though it ... so lovely in person, and the wool is so soft to the touch. With the goldtone filligree buttons it should be just awesome ... or at least that is my plan.
Maggie bought some of this wool from FM after I raved about it ... then chided me for understating how it is! She's done a review of her garment,but not blogged it just yet (that's a hint, maggie!) ETA: now blogged. I know she spent a couple nights fussing with the waistband, and says she isn't quite happy with it ... but all she needs is a matching vest (or a straight red vest, if you ask me) and an untucked blouse and no one will ever know about her waistband woes.
Right now, I am declaring a tentative victory on the princess seam FBA idea ... I will wait until I have both front pieces and the back done up before declaring a full victory, as up until I got the body done on the blouse I had thought I had that FBA right. I'll baste the side seams (probably in white for easy unpicking) and try it on to be absolutely certain before I go anywhere near the plaid wool with scissors.
Oh - I am not sewing this vest with black thread. I know from my previous use of this linen/cotton (the short gaucho pants from the summer) that it ravels just from regular handling while sewing ... there is no way it would hold up well to much seamripping, especially not black thread on black fabric. The stitches when done in black are really REALLY extremely difficult to see unless in direct sunlight ... yes this is the voice of experience speaking. So, I am using a very dark green thread, which I can see by the Ott-light if any seamripping will be necessary. Do I dare to hope for no further ripping other than the white thread?
I did snap an official "start" pic for the vest last night, and played with settings in GIMP until the plaid looked like it does in real life. A dark plaid is so difficult to photograph properly!

Maggie bought some of this wool from FM after I raved about it ... then chided me for understating how it is! She's done a review of her garment,
Right now, I am declaring a tentative victory on the princess seam FBA idea ... I will wait until I have both front pieces and the back done up before declaring a full victory, as up until I got the body done on the blouse I had thought I had that FBA right. I'll baste the side seams (probably in white for easy unpicking) and try it on to be absolutely certain before I go anywhere near the plaid wool with scissors.
Oh - I am not sewing this vest with black thread. I know from my previous use of this linen/cotton (the short gaucho pants from the summer) that it ravels just from regular handling while sewing ... there is no way it would hold up well to much seamripping, especially not black thread on black fabric. The stitches when done in black are really REALLY extremely difficult to see unless in direct sunlight ... yes this is the voice of experience speaking. So, I am using a very dark green thread, which I can see by the Ott-light if any seamripping will be necessary. Do I dare to hope for no further ripping other than the white thread?
07 January 2011
Simplicity 2566 vest - princess seam FBA
Deep breath ... here I go on the princess seam FBA idea! Since Simplicity 2566 also has a jumper that uses the same four bodice pieces as the vest .... and I'm still debating the idea of doing this jumper. I first had to decide how to handle the cutting lines. I decided if I do make the jumper, I will just tape the bottom back on ... so I cut along the vest's cutting line carefully and folded the rest up neatly.
Then, I held up the front piece to myself to find *my* bust apex and marked it, then lined up the side piece and marked the apex out in the side. Subtract the amount on the front panel ... and (I think) that should give me how far out I need to extend the side piece, minus seam allowance. Here's what I have so far:
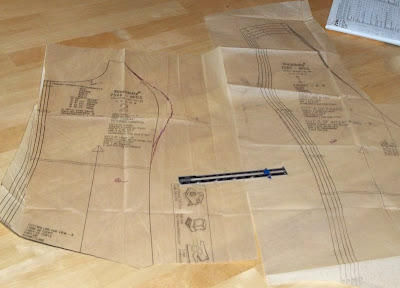 Wow ... that's out there pretty far. I tried to smooth the lines a bit, as it just looked funny on first draw. A closeup:
 If it's too big, I can always take it in ... but it's much more difficult to add to one that is too small.
Simplicity seems to believe that someone with size 18 shoulders ought to have a 40 inch bust ... mine wibble-wobbles between 42-43 inches depending on water retention. Of course, Simplicity's measurement chart also says I should have a 32 inch waist while mine varies between 34.5 and 36 inches - again depending on water retention - so I may need to add to the waistline, which I had to mark on the side piece. Oddly, there is no finished garment measurement for the waistline, although the bustline finished measurement is printed on both the pattern and the envelope.
If anyone more experienced at a princess seamed FBA sees a major mistake here, please post up a correction! Meanwhile, I should root around for some lunch, then pull out my linen/cotton to start this experiment on the intended lining fabric.
Then, I held up the front piece to myself to find *my* bust apex and marked it, then lined up the side piece and marked the apex out in the side. Subtract the amount on the front panel ... and (I think) that should give me how far out I need to extend the side piece, minus seam allowance. Here's what I have so far:


Simplicity seems to believe that someone with size 18 shoulders ought to have a 40 inch bust ... mine wibble-wobbles between 42-43 inches depending on water retention. Of course, Simplicity's measurement chart also says I should have a 32 inch waist while mine varies between 34.5 and 36 inches - again depending on water retention - so I may need to add to the waistline, which I had to mark on the side piece. Oddly, there is no finished garment measurement for the waistline, although the bustline finished measurement is printed on both the pattern and the envelope.
If anyone more experienced at a princess seamed FBA sees a major mistake here, please post up a correction! Meanwhile, I should root around for some lunch, then pull out my linen/cotton to start this experiment on the intended lining fabric.
Second batch of Shetland wools
I got nothing done yesterday on the vest or even the pattern FBA ... here's part of the reason why:
 My second order of Shetland wools arrived! The chelsea pink was darker than I expected ... but hubby's heathered alpine green is simply gorgeous in a subtle understated way. I also discovered last evening hubby had thought his color he asked for was grey, not green ... but when he looked at it in person he loved it. Hubby does like darker greens, and the muted hue of the wool is right up his alley. The wedgewood blue is nice and cheerful, and the cranberry red is just rich looking. Color me happy with this batch of wool coatings.
I still need to get a plastic tub just for my coatings (I think I'm up to 12 now?) and the no-smelly "mothballs" to protect them for our annual battle against the bug invasion that seems to occur every spring. I am planning a trip out with hubby's truck tomorrow when he gets off his 24 hour duty, as the size of tub I need just won't fit in my tiny Ford Escort. I do NOT want to lose these nice wools ... remember I have a year-long project for these beauties. Plus, I have 3 cats ...
Another reason I got nothing done yesterday is I did some housework. Don't fall out from shock ... it does happen occasionally! While I often maintain that a clean house is a sign of a broken sewing machine, there are occasions when things just need to be done even though the sewing machines are all functional. I figure I did enough yesterday to cover the entire month of January LOL
06 January 2011
S2566 blouse cuff detail
While still trying to pry my eyes open (with the help of coffee, of course) I decided to try to capture on pixels the buttons on my blouse cuffs. I did resist the urge to add a button to the neckline, so this one has six small buttons on the cuffs, 3 per side. It took me four tries, and pinning the sleeve up to try to catch the light ... but I not only have a decent representation of these goldtone/silvertone filligree buttons ... I have finally managed to capture the textured weave of this lovely fabric I rave about!
 I have a feeling this is as good as it will get for trying to photograph the buttons ... and it isn't hanging right because the sleeve is pinned up ... but now y'all can see why I love this solid white dress shirting. :)
Moving onwards to the vest now ... I've located all four pattern pieces. This vest has princess seams in both front and back, and I am leaving the optional back waist belt off because the plaid should be busy enough on its own. I shouldn't need to fuss with the back princess seams, but now it's time to review my notes on doing a princess seam FBA and give it a go ... on the lining first!
Speaking of the plaid ... should I try to match the plaid at the top of the princess seam, or the bottom? Right now I'm leaning towards matching the lower part of the princess seam so it's matched (hopefully!) all around my midsection. Feel free to leave an opinion, as I'll be busy with the pattern and lining for a day (or three ...) or so, depending on how successful I am with the FBA idea on this one.
Now, more coffee, then it's time to break out my colored ink pens.
Subscribe to:
Posts (Atom)